|
|
|
Filtering

|
The oil level must always be above the heating elements and at the proper oil level indicator on the rear of the vat. Failure to follow these instructions may result in fire, severe burns, and/or damage to the fryer. |

|
To avoid personal injury and fire, ensure that oil completely covers heating elements |
Do not bypass the Melt Cycle. The type of oil being used in the fryer determines the amount of heat applied during the Melt Cycle. If the controls are set to the Solid setting, less heat is applied to the solid oil than if the controls were set to Liquid. Too much heat applied to solid oil causes much smoking, and could cause a fire. Match this setting to the type of oil being used at the time. When using new solid oil, it is recommended to melt the solid oil on an outside source before placing oil in the vat.
|
|
Use high quality liquid frying oil in the open fryer. Some low grade oils have a high moisture content which causes foaming and boiling over. |
|
|
To avoid personal injury, do not move fryer or filter pan while containing hot oil. The filter pan must be as far back under fryer as it will go, and the cover in place. Be sure the hole in the cover lines up with the drain before opening the drain. |
|
|
To avoid severe burns when pouring hot oil into vat, wear personal protective equipment (PPE) and take care to avoid splashing. |
|
|
Slipping Hazard To avoid personal injury, do not exceed filter pan capacity. To avoid overfilling the filter pan, drain only 1 vat at a time. Make sure the floor area around equipment is completely clean and dry to avoid slip risks. |
|
|
Drain the oil at |
|
NOTICE - |
To avoid equipment damage, do not clean stainless steel with abrasive tools, abrasive cleaners or corrosive chemicals. |

NOTE: Best results are obtained when oil is filtered at the normal frying temperature.
- Turn the main switch to the OFF position.
- Remove and clean the fry basket in soap and water. Rinse and dry thoroughly.
- Use a metal spatula to remove any build up from the sides of the vat (vat).
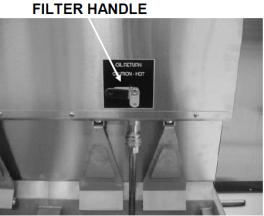
- Open the door(s) under unit, and then ensure the filter pan is pushed as far back under fryer as it will go, and the cover is in place. Also, be sure the hole in the cover lines up with the drain before opening the drain valve.
- Slowly turn the drain valve handle a half turn. Leave for a few minutes, then slowly, fully open the drain valve. This prevents splashing of the hot oil as it drains.
- As the oil drains from the vat, use approved Henny Penny brushes to clean the sides of the vat and the burner tubes or heating elements. If the drain fills with breading, use the straight white brush to push excess breading into the filter pan.
- When all the oil has drained, brush the sides and the bottom of the vat.
- Rinse the vat as follows:
- Close the drain valve.
- Open the filter valve.
- Move the pump switch to the pump position.
- Fill the vat 1/3 full, then turn off pump.
- Wash down and scrub the sides of the vat with the brushes.
- After the sides and bottom are cleaned, open the drain valve.
- Close the drain valve.
- Position return line over empty vat.
- Move the pump switch to the pump position.
- Fill the vat 1/3 full, then turn off pump.
- Wash down and scrub the sides of the vat with the brushes.
- After the sides and bottom are cleaned, open the drain valve.
- Check the level of the oil in the vat. Add fresh oil if necessary, until it reaches the top-level indicator line on the rear wall of the vat. See Filling and Adding Oil.
- To continue cooking, move the main POWER switch to the ON position, and oil reheats.
321 Open fryers-After April, 2002
Standard 322, 323, & 324 Open fryers
Rinsing the Vat with Optional Filter Rinse Hose

|
To avoid severe burns, use PPE when using filter rinse hose. |
The filter rinse hose and fitting will be hot. Use protective gloves or cloth when following this procedure or severe burns could result.
|
|
To avoid severe burns when using filter rinse, turn main power switch to off and use PPE. |
Only connect and disconnect the filter rinse hose when the main power switch is in the off position.
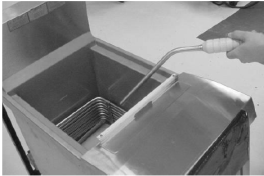
- Open the door and pull the collar back on the female quick-disconnect. Attach the male quick disconnect on the filter rinse hose, onto the female fitting.
- Point the hose nozzle down into the vat, close the filter valve, and move the PUMP switch to the PUMP position. Hold nozzle carefully to avoid excessive splashing.
- Rinse the vat interior, especially hard to clean areas like the vat bottom and heating elements.
- After sufficient rinsing, close the drain valve.
- Turn the PUMP switch to the OFF position.
- Detach hose, and raise the fitting end of the hose high for a minute to allow remaining oil in the hose to drain back into the vat.