|
|
|
Error Codes
The controls monitor procedure problems and system failures with warnings and error codes. The warning or error code displays, and an alarm sounds. Pressing Product button 2 cancels most warnings and pressing any control button stops most Error Code alarms. But there are some exceptions (see below). The error displays until the situation is corrected.
| Display | Cause | Solution |
|---|---|---|
|
“W-1” “LOW VOLTAGE” |
Incoming supply voltage too low |
Have voltage at plug and receptacle checked. |
|
“W-2” “SLOW HEATUP” |
Faulty components or connections |
Have elements, connections, and contactors checked. |
|
“W-3” “WAS NOT READY” |
Product loaded into vat before Ready lights illuminate |
Wait until peanut oil is at proper temperature before loading product. |
| “W-4” “SLOW COOKING” | Frozen or too much product in vat | Do not overfill or place frozen product into the vat. |
| “W-5” “SLOW COOKING” |
Product loaded into vat before Ready lights illuminate |
Wait until peanut oil is at proper temperature before loading product. |
|
“W-6” “SLOW COOKING” |
Faulty components or connections |
Have elements, connections, and contactors checked. |
| “W-7” “LOW AMPS” |
Faulty components or connections |
Have elements, connections, and contactors checked. |
| “W-9” “DISCARD PRODUCT” | Product overcooked (may appear after a “W-6”, “SLOW COOKING” warning) | Discard product immediately. |
| “OIL TOO HOT” | Tried to cook before peanut oil temperature lowers to current product’s setpoint |
CANCEL button will not stop this warning. This is for your safety. Wait until the peanut oil temperature drops to set point temperature, the alarm automatically stops. |
| E-4 CPU too hot | Control board overheating |
Turn the power switch to the OFF position, and then turn the switch back to ON. If E-4 persists, the control board is getting too hot:
|
| E-5 Oil too hot | Temperature probe open |
Turn the power switch to the OFF position, and then turn the switch back to ON. If E-6A persists, call service. |
| E-6A Oil probe open | Temperature probe shorted | Turn the power switch to the OFF position, and then turn the switch back to ON. If E-6B persists, calls for service. |
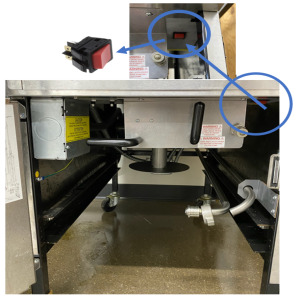
| E-10 High limit trip | High limit |
Allow oil to cool, and then reset the high limit by manually pushing up on the reset button. If the high limit does not reset, the high limit must be replaced. |
| E-10 High limit trip |
High limit PFE 500 - AA2404193 PFE 561 - AB2404002 PFG 600 - AN2404032 And after |
Allow oil to cool, and then reset the high limit by manually pushing and holding the reset (red rocker) switch for 5 seconds. If the high limit does not reset, the high limit must be replaced.
|
| E-12 (FPS equipped fryers only) | Faulty FPS probe | Turn the power switch to the OFF position, and then turn the switch back to ON. If E-12 persists, call for service. |
| E-13A and E-13B | Pressure assist sensor not detected |
Check the unit for pressure assist feature. If feature is not present, enter Tech mode and change T-2A Pressure Assist option to OFF. |
| E-15 Drain is open | Drain valve open while fryer on, or drain switch failure | Close the drain, using the drain valve handle. If E-15 displays, have the drain microswitch checked. Drain switch status can be viewed in Info Mode. |
|
E-16 Japanese SMS Controls only |
Gas pressure or burner jet failure |
Ensure oil level is at fill line. Ensure there is no water in the vat. Ensure the gas shut off valve is fully open and the quick disconnect is fully engaged. Ensure incoming gas pressure is at least 7 in wc for natural gas or 11 in for LP. If problem persists, call for service. |
| E-20C (SSI gas fryers only) | Ignition module(s) failure | Press the Timer button to try the ignition process. If the E-20C error persists, call for service. |
|
E-20D (SSI gas fryers only) |
No ignition |
Press the Timer button to try the ignition process. If the E-20D error persists, call for service. |
| E-25 (electric fryers only) | Heats amps too high | Check the setting in SP-12 (Special Program Mode) to ensure nominal Amps is set correctly. Also, have the electrical supply, wiring and elements checked. |
| E-26 (electric fryers only) | Heat amps locked on |
Have the contactors and PC board checked. NOTE: This error code could be displayed even with the Power switch turned to OFF. Unplug the fryer or shut off the wall circuit breaker to disconnect power to the fryer. |
| E-27 (electric fryers only) | Heat amps too low | Check the setting in SP-12 (Special Program Mode) to ensure nominal Amps is set correctly. Also, have the electrical supply, contactors, wiring and elements checked. |
| E-41 | Program settings lost |
Turn the power switch to the OFF position, and then turn the switch back to ON. If either E-41 or E-46 displays, try to reinitialize the control. If the error code persists, have the control board replaced. |
|
E-46 |
Control memory failure |
|
| E-47 | Analog converter chip or 12- Volt supply failure |
Turn the power switch to the OFF position, and then turn the switch back to ON. If the E-47 error persists:
|
| E-48 | Input system error | Call for service to replace PC board. |
| E-70A | Electrical issue | Call for service to check wiring and I/O board. |
| E-70B |
|
Call for service.
|
| E-70D | Wires crossed |
This occurs on Computron 1000 and 2000 fryers if the fryer type is incorrect.
|
|
E-86L |
Pressure Assist error message. |
Call for service. |
| E-92 | Fuse Issue | Call for service. |