Filtering the Oil
At the end of the preset number of Cook Cycles (5 for electric; 4 for gas), an alarm sounds and “FILTER LOCKOUT” then “YOU *MUST* FILTER NOW” shows in the display. No Cook Cycles can be started until the peanut oil is filtered (The controls show how many cycles until next filtering, ex: “5X” in display.)
Chick-fil-A’s training materials outline two methods of filtering the oil: a Quick Clean and a Thorough Clean. The Thorough Clean includes all the steps below (#1-10), whereas the Quick Clean omits step #6. Follow the steps in Chick-fil-A’s training materials when filtering the oil.
-
Turn the COOK/PUMP switch to OFF and remove basket.
NOTICE -
To avoid damaging elements, do not scrape or scrub with abrasive tools or pads. Scratches on the elements may cause breading to stick to them and burn.
-
Using a metal spatula, scrape any buildup from the sides of the vat. Do not scrape heating elements on electric units or the curved surface of the gas vat.

To avoid personal injury, do not move fryer or filter pan while containing hot oil. The filter pan must be as far back under fryer as it will go, and the cover in place. Be sure the hole in the cover lines up with the drain before opening the drain.

Burn Risk
To avoid burns, use PPE when filtering oil or cleaning vat.

-
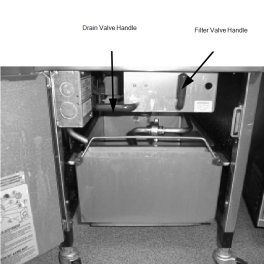
Turn the left drain handle counterclockwise half a turn first, then slowly to the full open position (handle pointed down for electric models and pointed up for gas models). This helps prevent splashing of hot peanut oil.
-
As the peanut oil drains from the vat, use fryer brushes (Henny Penny part no. 12105-includes both brushes) to clean the vat and heating elements (if electric unit). Use L-shaped brush to clean crumbs from the elements and from sides and bottom of vat as peanut oil drains. Use poker brush to push crumbs through drain opening in bottom of vat, if necessary.
-
When all peanut oil has drained, scrape or brush sides of vat.
-
Rinse the vat as follows:

-
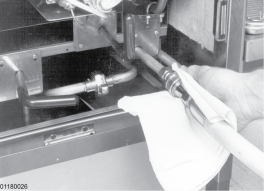
Attach the filter rinse hose to the quick-disconnect fitting, inside the door, next to the filter valve handle. Slide the collar back on the quick-disconnect fitting on the hose, push it onto the unit’s fitting and let it snap into place.

-
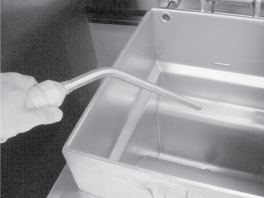
While holding the wooden handle, ensure the hose nozzle is pointed down into the bottom of the vat. Pull the lid down over the nozzle, close the filter valve, and move the COOK/ PUMP switch to the PUMP position. Hold nozzle carefully to avoid excessive splashing.
-
Rinse the vat interior, especially areas like the vat bottom. On electric models, rinse around heating elements.
-
After sufficient rinsing, turn the left drain valve handle clockwise to close the drain valve (handle pointed horizontally).

To avoid severe burns when using filter rinse, turn main power switch to off and use PPE.
Only connect and disconnect the filter rinse hose when the main power switch is in the off position.
-
Turn the COOK/PUMP switch to OFF.
-
Detach the hose, and then raise fitting end of the hose high for a minute to allow any peanut oil remaining in the hose to drain into the vat.
-
-
Turn the right filter valve handle counterclockwise to open the filter valve (handle pointed horizontally). Turn COOK/PUMP switch to PUMP and pump all peanut oil out of the filter drain pan and back into vat, holding the lid closed for the first surge of peanut oil.
-
When the pump begins creating air bubbles in the peanut oil, all of the peanut oil should be out of drain pan. First, turn the right filter valve handle clockwise to close the filter valve (handle pointed up). Then turn the COOK/PUMP switch to OFF. This keeps the filter pump and lines from filling with peanut oil.
NOTE: When air bubbles appear in peanut oil, immediately close the filter valve. This will prevent aeration of the oil, therefore increasing oil life.
-
After completing the filtering operation, empty and replace the condensation drain pan.
-
If frying is to be continued, turn the COOK/PUMP switch to COOK and allow peanut oil to heat until Ready indicator illuminates.


