Filtering of Oil
Frying breaded food requires frequent filtering. Clean the vat as follows each time the oil is changed or filtered.

|
Follow the instructions below to avoid oil overflowing the vat, which could result in serious burns, personal injury, fire, and/or property damage. |
-
To protect the oil when the fryer is not in immediate use, the fryer should be turned off.
-
Frying breaded products requires filtering to keep the oil clean. Oil should be skimmed frequently throughout the day and filtered thoroughly once a day.
-
Dispose oil if display shows “CHANGE OIL SOON” or if oil shows signs of excessive foaming or smoking.
-
Maintain the oil at the proper cooking level. Check and fill the reserve oil tank throughout the day.
-
Do not overload the baskets with product, or place product with extreme moisture content into baskets.
NOTE: The best results are obtained when the oil is filtered at normal frying temperature.
-
Turn main power switch to the off position.
-
Remove and clean the fry basket in soap and water. Rinse thoroughly.
NOTICE -
To avoid damaging elements, do not scrape or scrub with abrasive tools or pads. Scratches on the elements may cause breading to stick to them and burn.
NOTICE -
To avoid equipment damage and ensure lid seal, do not strike tools on vat band or vat rim.
-
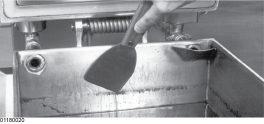
Use a metal spatula to scrape any build up from the sides of the vat.
To avoid severe burns, do not open the drain valve while vat is under pressure. Allow the pressure to reduce to atmospheric pressure.
-
Open the drain valve very slowly, half a turn at first and then slowly to the full open position. This will prevent excessive splashing of the hot oil as it drains into the filter pan.
-
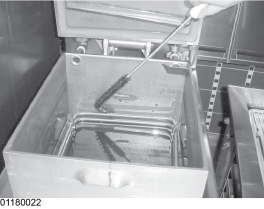
As the oil drains from the vat, use fryer brushes (Part No. 12105) to clean the side of the vat and the heating elements (if electric unit). If the drain fills with breading, use the white brush to push the breading into the filter pan.
-
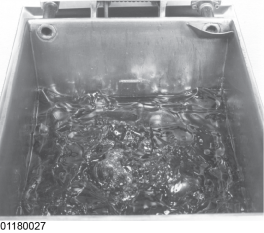
When all the oil has drained, scrape or brush the sides and the bottom of the vat.
-
Rinse the vat as follows:
-
Close the drain valve.
-
Open the filter valve.
-
Lower lid and hold closed.
-
Move the main power switch to the pump position. Carefully open the lid to ensure the oil is returning properly. Fill vat 1/3 full, then top off pump.
Failure to hold the lid closed so that the first surge of the returning oil will not splash out of the vat will result in severe burns.
Burn Risk
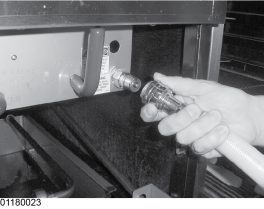
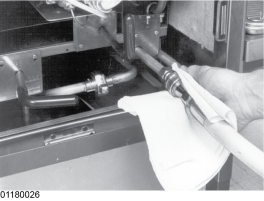
To avoid severe burns, turn off filter pump and wear personal protective equipment (PPE) when touching union on filter tube.
If there are air bubbles coming up in the oil, it’s possible that the filter connection at the union on the filter tube is not tightened properly. If so, turn off the pump and wear PPE when tightening the union.
-
Wash down and scrub the sides of the vat. Use “L” brush to clean the heating elements.
-
After the sides and bottom are cleaned, open the drain valve.
-
-
If an optional filter rinse hose is available on your fryer, the following cleaning procedure may be used.
-
Attach the filter rinse hose with its quick disconnect fitting to the male fitting inside the door next to the filter valve handle. To do this, slide back the spring ring on the female side of the quick disconnect fitting and let it snap into place over the male half of the fitting.
To avoid severe burns, use PPE when using filter rinse hose.
The filter rinse hose and fitting will be hot. Use protective gloves or cloth when following this procedure or severe burns could result.

-
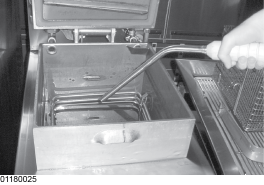
While holding the wooden handle, ensure the hose nozzle is pointed down into the bottom of the vat. Pull the lid down over the nozzle, close the filter valve, and move the main power switch to the pump position. Hold nozzle carefully to avoid excessive splashing.
-
Rinse the vat interior. Especially work on hard to clean areas, like the vat bottom. On electric models, clean around heating elements.
-
After sufficient rinsing with oil, close the drain valve.
To avoid severe burns when using filter rinse, turn main power switch to off and use PPE.
Only connect and disconnect the filter rinse hose when the main power switch is in the off position.
-
Turn the main power switch to the off position.
-
Detach the hose. Raise the fitting end of hose high for a minute to allow the remaining oil in the hose to drain into the vat.
-
-
Pump all the oil out of the filter pan and back into the vat. Close lid during first surge of pumping.
-
When the pump is pumping air only, the oil in the vat will appear to be boiling. Close the filter valve first, and then move the power switch from pump to off. This will keep the filter pump and lines from filling up with oil.
NOTE: When bubbling occurs, immediately close the filter valve. This prevents aeration of the oil, therefore increasing oil life.
-
Check the level of the oil if necessary, until it reaches the level indicator line on the rear wall of the vat, or top level indicator on model 500.
-
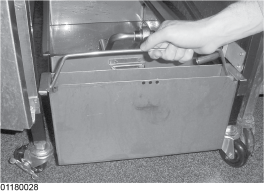
After completing the filtering operation, empty and replace the condensation drain pan.