Error Codes
|
DISPLAY |
CAUSE |
PANEL BOARD CORRECTION |
|---|---|---|
|
“E-4” |
Control board overheating |
Turn switch to OFF position, then turn switch back to ON; if “E-4” continues, the board is getting too hot; check for signs of overheating behind the control panel; once panel cools down the controls should return to normal; if “E-4” persists, have control panel replaced |
|
“E-5” |
Oil overheating |
Turn switch to OFF position, then back to ON; if “E-5” continues, the heating circuits and temperature probe should be checked; once the unit cools down, the controls should return to normal; if “E-5” persists, have control panel replaced |
|
“E-6” |
Temperature probe failure |
Turn switch to OFF position, then back to ON; if the “E-6” continues, the temperature probe should be checked; once the probe is repaired, or replaced, the controls should return to normal; if “E-6” persists, have control panel replaced |
| “E-6 A” | Temperature probe open | Turn switch to OFF position, then turn switch back to ON; if display shows “E-6”, have the temperature probe checked |
| “E-6 B” | Temperature probe shorted | Turn switch to OFF position, then turn switch back to ON; if display shows “E-6” have the temperature probe checked |
|
“E-10” |
High limit |
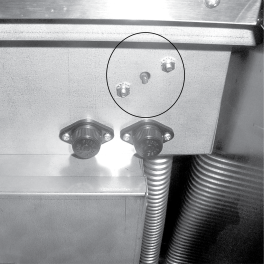
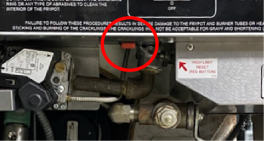
Allow oil to cool, and then reset the high limit. If the high limit does not reset, the high limit must be replaced. To reset the high limit:
|
| "E-15" | Drain switch failure | Close drain, using the drain valve handle; if display still failure shows “E-15”, have the drain microswitch checked |
| “E-20 A” | Vacuum switch failure (stuck closed) | Press the timer button to try the ignition process again, and if “E-20 A” persist, check the air switch |
| “E-20 B” | Draft fan or vacuum switch failure (stuck open) | Press the timer button to try the ignition process again and if “E-20 B” persist, check the vacuum switch or the blower motor |
| “E-20 C” | Ignition modules not responding | Press the timer button to try the ignition process again; if “E-20 C” persists, check the ignition module, the spark ignitor per Pilot/Ignitor Module Section, the I/O board |
|
“E-20 D” |
Pilots not lit or no flame sense |
Press the timer button to try the ignition process again; if “E-20 D” persists, check the ignition module, the I/O board per Control & I/O Boards Section or the flame sense |
| “E-25” | Heat amps too high | Heating elements drawing too much current; have heat circuit checked |
| “E-26” | Heat amps locked on | Heating elements are drawing current when controls are not calling for heat; have controls and heat circuit checked |
| “E-27” | Heat amps too low | Heating elements current is lower than expected; have heat circuit checked |
|
“E-31” |
Elements not hinged all the way down |
Check to make sure the elements are hinged all way down into the vat; check for obstructions under elements way down |
|
“E-41” |
Programming failure |
Turn switch to OFF position, then back to ON; if display shows “E-41”, the control should be re- initialized (See Programming Section) if the error code persists, have control panel replaced |
| “E-47” | Analog converter chip or 12 volt supply failure | Turn switch to OFF, then back to ON, if “E-47” persists, have the I/O board, or the PC board replaced; if speaker tones are quiet, probably I/O board failure |
| “E-48” | Input system error | Have PC board replaced |
| “E-70 B” | Faulty power switch, or switch wiring; faulty I/O board | Have power switch checked, along with its wiring; have Input/Output board replaced if necessary |
| “E-70” | Faulty power switch, or switch wiring; faulty I/O board | Have power switch checked, along with its wiring; have Input/Output board replaced if necessary |
|
“E-71” |
Pump motor relay failure or wiring problem |
Replace relay if contacts are stuck closed; check wiring on POWER/PUMP switch, or at wall receptacle; L1 and N may be reversed |
|
“E-92” |
24 VAC fuse on I/O board open |
Have components, in 24-volt circuit (I.E., hi limit, drain switch) checked for shorts |
| “E-32, FAN FAIL ERROR, CHECK BLOWER, CLEAN DILUTIONBOX, CALL HENNY PENNY SERVICE” | Air pressure switch open; clogged dilution box or faulty blower; open drain switch; open high limit |
Clean dilution box or replace blower if necessary; have drain switch checked; allow oil to cool and reset high limit or have high limit checked. Resetting High Limit:
|
CE Only - Along with the previous error codes, CE units have the following self-diagnostic error codes:
|
DISPLAY |
CAUSE |
PANEL BOARD CORRECTION |
|---|---|---|
|
“E-10” |
High limit |
Allow oil to cool, and then reset the high limit. If the high limit does not reset, the high limit must be replaced. To reset the high limit:
|
|
“E-15” |
Drain switch |
Close the drain, using the drain valve handle; if display still shows “E-15”, have the drain microswitch checked |
|
“E-20A” |
Air pressure switch failure |
Press the timer button to try the ignition process again, and if “E-20A” persists, call Henny Penny’s Service (stuck closed) Department |
| “E-20B” | Draft fan or air pressure switch failure (stuck open) | Press the timer button to try the ignition process again, and if “E-20B” persists, call Henny Penny’s Service Department |
|
“E-20C” |
Left gas module failure |
Press the timer button to try the ignition process again, and if “E-20C” persists, call Henny Penny’s Service Department |
| “E-20D” | Right module failure | Press the timer button to try the ignition process again, and if “E-20D” persists, call Henny Penny’s Service Department |
|
“E-20E” |
Both modules failure |
Press the timer button to try the ignition process again, and if “E-20E” persists, call Henny Penny’s Service Department |
| “E-20F” | Left module no flame sense | Press the timer button to try the ignition process again, and if “E-20F” persists, call Henny Penny’s Service Department |
|
“E-20G” |
Right module no flame sense |
Press the timer button to try the ignition process again, and if “E-20G” persists, call Henny Penny’s Service Department |
| “E-20H” | Both modules no flame sense | Press the timer button to try the ignition process again, and if “E-20H” persists, call Henny Penny’s Service Department |


