Filtering
The Henny Penny electric 8 Head fryer, model 691, must be cleaned and the oil filtered at least twice daily; after lunch rush and at the end of the day.
 | Drain the oil at |
 | Overflow Risk Filter only when the oil temperature is less than |
 | Burn Risk To avoid burns and damage to the filter pump motor, turn the diverter valve to the fill position when filter rinse hose is not in use. |
 | Burn Risk Use protective cloth or glove when disconnecting the filter union or severe burns could result. If the filter pan is moved while full of oil, use care to prevent splashing, or severe burns could result. |
 | To avoid personal injury, do not move fryer or filter pan while containing hot oil. The filter pan must be as far back under fryer as it will go, and the cover in place. Be sure the hole in the cover lines up with the drain before opening the drain. |
 | To avoid severe burns when using filter rinse, turn main power switch to off and use PPE. |
Only connect and disconnect the filter rinse hose when the main power switch is in the off position.
 | Burn Risk To avoid burns, follow on-screen prompts for Express Filter and Daily Filter. |
Failure to follow the Express Filter and Daily Filter procedures may cause the accumulation of crumbs and debris at the bottom of the fry vat, which may cause oil to spray out of the fryer.
 | Burn Risk To avoid burns and damage to the filter pump motor, turn the diverter valve to the fill position when filter rinse hose is not in use. |
High volume cooking could cause the cold zone to fill quicker with cracklings and cleaning may be required more often. Part of the process involves removing cracklings from the cold zone of the vat.

Turn COOK/PUMP switch to OFF position.
Make sure filter pan is under fryer and the filter union is tightened to the standpipe, coming out of the pan.
Remove cooking racks and carrier, and wipe bottom of lid. Tilt lid out of the way to clean vat.

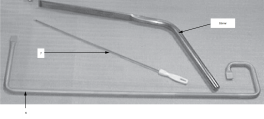
Use L-shaped brush to clean cracklings from the heating elements and from sides and bottom of vat as oil drains.
Use straight brush to push cracklings through drain opening in bottom of vat if necessary, and to clean between the heating elements and the vat wall.
When all of the oil has drained, scrape or brush the sides and bottom of the vat, and swing drain valve handle to the closed position.
If an optional filter rinse hose is available on your fryer, the following cleaning procedure may be used, otherwise continue onto step 9.
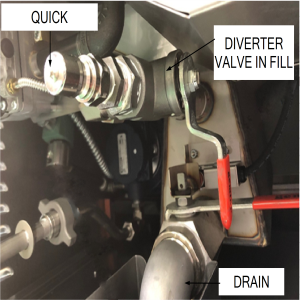
Attach the filter rinse hose with its quick disconnect fitting to the male fitting, located next to the filter valve handle. Slide back the spring ring on the female side of the quick disconnect fitting and let it snap into place over the male half of the fitting.
Turn the diverter valve to the filter rinse hose position.
With the end of the filter rinse hose aimed down into the fry vat, turn COOK/PUMP switch to pump.
Rinse the vat interior. Especially work on hard to clean areas, like the vat bottom and burner tubes.
After thorough rinsing with oil, turn the COOK/PUMP switch to OFF, close the drain valve and turn the diverter valve to the fill position.
Detach the hose and raise, the fitting end of hose, high for a minute to allow the remaining oil in the hose to drain into the vat.
Turn COOK/PUMP switch to PUMP.
When all oil has been pumped into vat, turn COOK/PUMP switch off.
