Fill and Add Oil

|
To avoid severe burns when pouring hot oil into vat, wear personal protective equipment (PPE) and take care to avoid splashing. |

|
The oil level must always be above the heating elements and at the proper oil level indicator on the rear of the vat. Failure to follow these instructions may result in fire, severe burns, and/or damage to the fryer. |

|
Use high quality liquid frying oil in the open fryer. Some low grade oils have a high moisture content which causes foaming and boiling over. |

|
To avoid personal injury and fire, ensure that oil completely covers heating elements |
Do not bypass the Melt Cycle. The type of oil being used in the fryer determines the amount of heat applied during the Melt Cycle. If the controls are set to the Solid setting, less heat is applied to the solid oil than if the controls were set to Liquid. Too much heat applied to solid oil causes much smoking, and could cause a fire. Match this setting to the type of oil being used at the time. When using new solid oil, it is recommended to melt the solid oil on an outside source before placing oil in the vat.
Manually Filling an Empty Vat
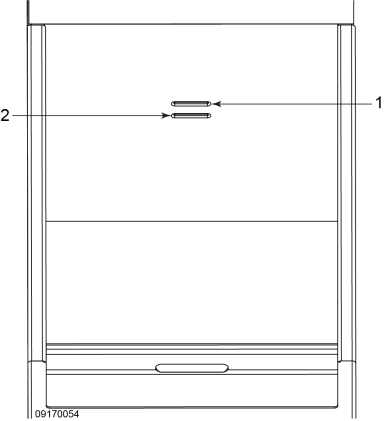
The CFE 415 vat has two level indicator lines inscribed on the rear wall of the vat (refer to Figure 3-3 Level Indicator Lines, page 15): upper (1) and lower (2). The upper fill line indicates proper oil level at set point temperature. The lower fill line indicates proper oil level at room temperature. When filling an empty vat with room temperature oil, fill to the center of the lower fill line (2). As oil heats, it expands to the upper fill line (1).

Topping Off a Vat
The CFE 415 includes an auto top off feature which safely replenishes oil to the fill line throughout the day from the reserve oil tank. Auto top off activates in between cook cycles when the oil is heated to set point temperature and the fryer sits idle for 60 seconds or longer. In cases where cook cycles continuously run without a pause for an extended period of time, new oil may be manually added to the vat from the reserve oil tank through the “FILL FROM RESRV” option in the filter menu. This feature in enabled only when there are no cook cycles running and no filter cycles activated. Use either of these features instead of manually pouring new oil into a vat that contains hot oil.
Filling Reserve Oil Tank
During morning start-up procedures and between busy periods, fill the reserve oil tank. Fill the reserve oil tank also if “FILL RESERVE OIL”, or “E-1” appears in the display.
Best Practice: Check the reserve oil tank not only during opening procedures, but also between busy periods and top off the tank if oil is low. This keeps team members focused on delivering quality product rather than having to fill the reserve oil tank during busy periods. This also helps prevent an “E-1” low oil error code. The following instructions describe filling the reserve oil tank:
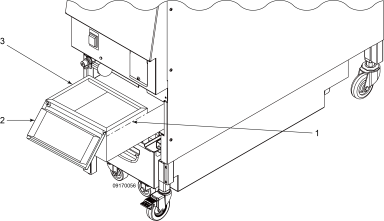
- Pull reserve oil tank(3) forward and open cover (2) (refer to Figure 3-4 Reserve Oil Tank, page 16).
- Pour oil into reserve oil tank and fill to the fill line (1),
- Close cover (2) and gently push reserve oil tank back into position.


