|
|
|
Filtering

|
Follow the instructions below to avoid oil overflowing the vat, which could result in serious burns, personal injury, fire, and/or property damage. |
-
To protect the oil when the fryer is not in immediate use, the fryer should be turned off.
-
Frying breaded products requires filtering to keep the oil clean. Oil should be skimmed frequently throughout the day and filtered thoroughly once a day.
-
Dispose oil if display shows “CHANGE OIL SOON” or if oil shows signs of excessive foaming or smoking.
-
Maintain the oil at the proper cooking level. Check and fill the reserve oil tank throughout the day.
-
Do not overload the baskets with product, or place product with extreme moisture content into baskets.

|
With prolonged use, the flashpoint of oil is reduced. To avoid personal injury or property damage, do not use oil that is foaming or shows signs of excessive smoking. If the oil temperature exceeds 420°F (216°C), immediately shut off the power at the main circuit breaker and have the fryer repaired. If oil temperature exceeds its flash-point, fire will occurs, resulting in severe burns and/or property damage. |
Filter Menu
Along with Express Filter and Daily Filter, here is a listing of all the Filter Menu items available. Press and hold the filter button to enter the filter menu:
1. Express Filter
2. Daily Filter
3. Dispose
4. Drain To Pan
5. Fill From Pan
6. Fill From Resrv (reserve oil tank)
7. Exit
Express Filter
|
|
Burn Risk To avoid burns, follow on-screen prompts for Express Filter and Daily Filter. |
Failure to follow the Express Filter and Daily Filter procedures may cause the accumulation of crumbs and debris at the bottom of the fry vat, which may cause oil to spray out of the fryer.
An Express Filter is the fryer’s terminology for a quick clean. The Express Filter is a quick way to ensure that excess coating in the vat gets removed to keep it from scorching and degrading the oil.
Automated Express Filter
After about five to ten cook cycles based on usage, or after three hours, the Filter Light illuminates on the front of the fryer, and FILTER LOCKOUT”/“YOU *MUST* FILTER NOW displays. The control refuses further cook cycles until the vat is filtered.
- Press the 1 button to start the Express Filter. OPEN DRAIN displays.
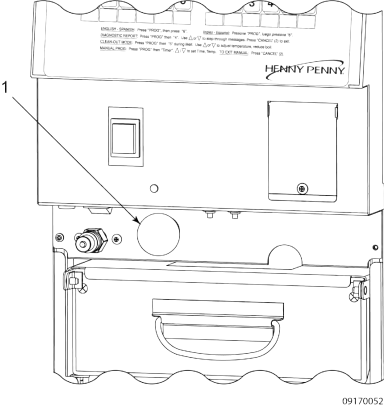
- Pull drain knob (1) out, DRAINING displays and oil drains from vat, and then WASHING displays. The filter pump motor automatically turns on and oil jets on the bottom of the vat wash excess coating down the drain. CLOSE DRAIN displays after the wash cycle.
- Push in on drain knob (1) to close drain. FILLING displays and vat refills with oil.
- Once vat is filled, POT FILLED? YES NO displays. Make sure vat is full to at least the lower fill line, and then press product button 1. WAIT displays while the vat heats to set point temperature.
- If the oil has not pumped back to the proper level in the vat during the Express Filter process, press the 3 button and pump runs for another minute. This ensures that all of the oil is pumped out of the drain pan and back up to the vat, IS POT FILLED? YES NO displays.
- Make sure the vat is full to at least the lower fill line, do the following:
- Press the 3 button to continue filling.
- Press the 1 button to return to normal operation.

INFORMATION: If the drain is clogged, VAT EMPTY displays. Use straight white brush to clear drain. Visually check the vat is empty and press the 1 button to proceed with filtering process.
Best Practice: Use a brush to loosen and remove excess coating from the heating elements and gently from the temperature sensors during the wash.
Or
You can try to fill the vat 3 times. After that, FILL DONE displays to allow manually running the pump to refill the vat.
Best Practice: To help ensure vat fills completely, clean the filter pan at least once a day, change the filter envelope at least once a day, and make sure the reserve oil tank is full and that the o-rings on the filter pan are not damaged or missing.
Forcing an Express Filter to Reset Filter Count
An Express Filter can be started before the fryer goes into filter lockout.
- To reset the filter count back to 5.0, press and hold the filter button and FILTER MENU and 1. EXPRESS FILTER display.
- Press the 1 button, CONFIRM displays, followed by YES NO.
- Press the 1 button to start.
Best Practice: Manually initiating an Express Filter is beneficial to do between busy periods as it resets the fryer back to five full cooks (5.0). By doing this, the fryer can continue to cook without interruption during busy periods.
Daily Filtering
|
|
Burn Risk To avoid burns, follow on-screen prompts for Express Filter and Daily Filter. |
Failure to follow the Express Filter and Daily Filter procedures may cause the accumulation of crumbs and debris at the bottom of the fry vat, which may cause oil to spray out of the fryer.
A Daily Filter is the fryer’s terminology for a thorough clean and should be done once a day. The Daily Filter is similar to an Express Filter however it adds steps to scrub the vat and to rinse the vat. It also includes options to repeat the wash cycle. This procedure can be performed during any non-frying periods. A new filter envelope should be used on the first filter of each day, but the same filter envelope can be used for the rest of the day. Make sure that filter pan cover is in place., filter drain tube is secured, and filter drain pan is pushed into place. if filter drain pan and cover are not latched into place, CHK PAN displays.
- Press and hold the filter button until 1.EXPRESS FILTER? displays.
- Press the down button, 2.DAILY FILTER? displays.
- Press the 1 button, CONFIRM displays, followed by YES NO.
- Press the 1 button, YES, OPEN DRAIN displays.
- Pull out on the drain knob. DRAINING displays and the oil drains form the vat (or press the 3 button and controls return to normal operation).
- While washing, use a Henny Penny approved brush to remove crumbs and coating from the sides, heating elements and the bottom of the vat. Once the vat is clean, SCRUB VAT COMPLETE? YES NO displays. NOTICE: Be gentle when cleaning around the temperature sensors to prevent damage.
- Press the 1 button. WASHING displays and oil circulates through the vat for several minutes. When wash cook cycle is complete, WASH AGAIN? YES NO displays.
- Press the 1 button, if another wash is needed, otherwise press the 3 button, and the CLOSE DRAIN displays.
- Push in on drain knob (1) to close drain, RINSING displays and the vat fills with oil. Once the vat is filled, OPEN DRAIN displays.
- Pull out on drain knob to open the drain, RINSING displays. When rinsing is complete, RINSE AGAIN? YES NO displays. Do one of the following:
- Press the 1 button if another rinse is needed.
- Press the 3 button, POLISH? YES displays.
- Press the 1 button for YES and oil is “polished” by circulating it through the filtering system, 5:00 NO=STOP displays.
- If desired, press the 3 button to stop the polishing, otherwise the oil is polished for 5 minutes. Once the oil is polished, FILL VAT? YES displays.
- Press the 1 button and CLOSE DRAIN displays. Push in the drain knob to close drain, FILLING displays and the vat refills with oil.
- Once full, IS POT FILLED? YES NO displays, do one of the following:
- Press the 1 button, the fryer returns to normal operation.
- Press the 3 button, FILLING displays. You can try to fill the vat four times and then ADD QUIT displays.
- Press left timer button and JIB pump runs 60 seconds, filling vat from reserve oil tank.
- When vat is full, press the right timer button and display shows IS POT FILLED? YES NO.
- Press product selection 1 and fryer returns to normal operation.
Or
Or
Disposing Oil
|
|
Burn Risk To avoid burns, use PPE when connecting to or disconnecting from oil disposal unit. |
This procedure requires the use of an oil disposal shuttle intended for use with hot oil and the filter rinse hose. For controls and indicators information, refer to User Interface Controls & Indicators. Dispose oil from vat by following these instructions:
- Locate disposal shuttle or filter rinse hose and attach to fryer.
- Press and hold the filter button until *FILTER MENU* displays, along with 1.EXPRESS FILTER?
- Press the down button twice until 3.DISPOSE displays.
- Press the 1 button, DISPOSE? YES NO displays.
- Press the 1 button, DRAIN VAT? YES NO displays.
- Press the 3 button, if draining the vat is not desired and skip to step 9.
- Press the 1 button, and Filter Light flashes and OPEN DRAIN displays.
- Pull out black drain knob to open drain and DRAINING displays.
- Oil drains from vat into drain pan and then VAT EMPTY YES NO displays.
- Verify the vat is empty, and then press the 1 button. CLEAR OLD OIL FROM OIL LINES DISPOSE DONE displays.
- Press and hold the left timer button for a few seconds to clear old oil.
- Once cleared, press the right timer button, DONE CLN VAT COMPLETE YES NO displays.
- Once vat is clean, press the 1 button, HOSE READY? displays.
- Ensure the hose is connected to fryer, and aimed into disposal shuttle.
- Press and hold the one button to dispose. YES= Pump NO= Done displays.
- Once oil is no longer pumping from drain pan, press the right 3 button. Blue Filter Light flashes and CLOSE DRAIN displays.
- Push in the black drain valve knob to close drain. MANUAL FILL VAT, followed by IS POT FILLED?, along with YES NO displays.
- Fill the vat to the lower indicator line on the rear of the vat. Refer to Manually Filling or Adding Oil.
- Press the 1 button to return to normal operation.

|
|
Slipping Hazard To avoid personal injury, do not exceed filter pan capacity. To avoid overfilling the filter pan, drain only 1 vat at a time. Make sure the floor area around equipment is completely clean and dry to avoid slip risks. |
|
|
To avoid severe burns when pouring hot oil into vat, wear personal protective equipment (PPE) and take care to avoid splashing. |
Drain to Pan
DRAIN TO PAN drops the oil immediately to the drain pan. The oil must be manually pumped back into the vat using 5. FILL FROM PAN. This step is used for special circumstances such as service of a component in the vat.
- Press and hold either filter button until *FILTER MENU* displays, followed by 1.EXPRESS FILTER.
- Press the down button three times until 5. DRAIN TO PAN displays.
- Press the 1 button and do the following:
- OPEN DRAIN is displayed if the drain pan is in positioned under the fryer.
- If CHK PAN displays, insert the drain pan and push it back as far as possible under the fryer.
- Pull the drain handle to drain the oil.
|
|
Slipping Hazard To avoid personal injury, do not exceed filter pan capacity. To avoid overfilling the filter pan, drain only 1 vat at a time. Make sure the floor area around equipment is completely clean and dry to avoid slip risks. |
Fill from Drain Pan
FILL FROM PAN pumps oil from the drain pan back up to the vat. This step can be helpful to troubleshoot whether the filter pump motor runs, or to ensure that all oil is pumped out of the drain pan if the pan is to be removed from the fryer.
- Press and hold the filter button until *FILTER MENU* followed by 1.EXPRESS FILTER displays.
- Press the down button four times until 5. FILL FROM PAN displays.
- Press the 1 button, and FILL and DONE displays.
- Press the left timer button, and FILLING displays. Oil is pumped from the drain pan to the vat.
- Stop the pump by pressing the left timer button again.
Fill from Reserve oil Tank
If the oil level is a little low, oil can be added to vat at any time from reserve oil tank to raise oil level to proper level by following steps below. This procedure is not to be used to fill an empty vat.
- Press and hold either filter button until *FILTER MENU* followed by 1.EXPRESS FILTER displays.
- Press the down button five times until 6. FILL FRM RESRV displays.
- Press the 1 button, FILL and DONE displays.
- Press and hold the left timer button, FILLING displays.Oil is pumped from the reserve oil tank to the vat.
- Once the vat is full, release the timer button, FILL and DONE displays.
- Press the right timer button, and then the 3 button to return to normal operation.
Drain Pan Assembly
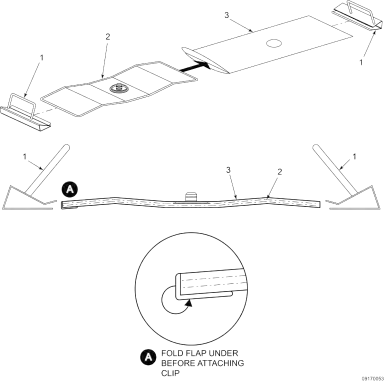
Remove and clean the drain pan assembly at the end of the night. The drain pan should be clean prior to closing. Assemble the clean, dry drain pan per the following instructions:
- Slide a filter envelope (3) onto the filter screen (2) so the plug is protruding through the hole.
- Fold the open end of the filter envelope inward, then fold the end down to seal off the opening (see detail A).
- Slide the two handle clamps (1) onto the ends of the filter screen assembly with the handles facing the same direction of the plug.
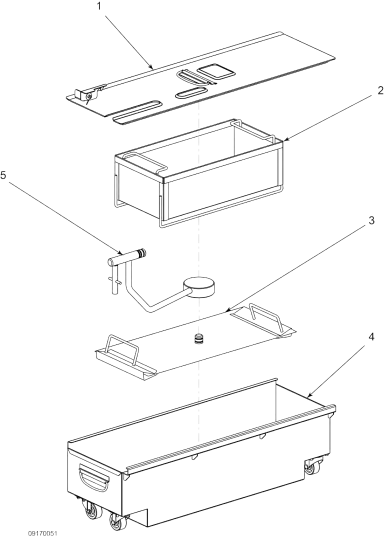
- Place the filter screen (3) into the bottom of the drain pan (4) with the plug side up.
- Lining up the hole of the pickup tube (5) with plug of the filter screen (3) , press the tube down.
- Position the pickup tube (5) so that the guides slide into the notches located on the holder in the front of the drain pan (4), then press down on the pickup tube to confirm it is fully engaged on the filter screen plug (3) and in the holder.
- Place the crumb basket (2) into the drain pan (4) so the legs straddle the filter screen (3).
- Place lid (1) onto drain pan. Slide the bent side of the drain pan lid (1) into the lip end of the drain pan base first.
- Lubricate the O-rings on the filter tube with cold oil before placing the drain pan assembly back into position.
- Using a small flat-bladed screwdriver, pry up on the O-ring and pull O-ring off end of tube.
- Push the drain pan into place and lock it into place using the locking latch.
- To remove the drain pan for cleaning, reverse this procedure.
Best Practice: During assembly, be sure to apply new oil to all o-rings to lubricate to help prevent tears and loss.