|
|
|
Preventative Maintenance
Clean-Out Mode

|
Only perform this procedure when the unit is cool or severe burns may result. |
|
|
In the event of cleaning solution boil over, immediately turn the power switch to OFF. Do not try to contain by closing the fryer lid or severe burns could result. |
|
|
To avoid personal injury, always wear PPE when cleaning vat and follow instructions on the cleaning solution. |
Always wear chemical splash goggles or face shield and protective rubber gloves when cleaning the vat as the cleaning solution is high in alkaline. Avoid splashing or other contact of the solution with your eyes or skin. If solution comes in contact with your eyes rinse thoroughly with cool water and see a physician immediately.
|
|
To avoid severe burns:
|
The clean-out mode removes carbon build up from the inside of the fry vat. The clean- out mode should be performed on a monthly basis to remove this accumulation, otherwise carbon will transfer a burnt flavor to the oil and decrease the accuracy of the sensors in the vat.
- Turn the power switch off.
- Cover adjoining vats to avoid splashing water and cleaner from coming into contact with oil. Do not cook product in adjoining vat when clean-out mode is in progress to avoid contaminating oil and/or product.
- If hot oil is present in the vat, pull out black drain knob and drain oil into drain pan (or, pump oil into disposal shuttle). An E-15 error displays indicating the drain is open.
- After oil has been drained, close the drain by pushing in the black knob and proceed with normal oil dispose procedure.
- After allowing the drain pan to cool, remove the filter pan. Remove the filter screen and dispose the old filter pad. Replace filter screen.
- Place filter pan assembly back under unit.
- Follow the directions in Chick-fil-A’s training materials and fill the vat to the level indicator line with cleaning solution.
- Turn the power switch to on. Then press the program button followed by product selection 5, CLEAN-OUT? then 1=YES 3=NO displays. Press the 1 button to start Clean-Out Mode.
- The fryer displays *CLEAN-OUT MODE* and heats up to a pre-programmed temperature, then automatically begins a 15 minute timed countdown. Use the up or down button if necessary, to adjust the temperature and keep the cleaning solution from boiling over.
- Using the fryer brush (Henny Penny part number 12105), scrub the inside of the vat, and around the counter top of the fryer. Never use steel wool or green scrub pad to scrub the fryer. Place basket in vat with cleaning solution and scrub basket.
- After the cleaning mode has completed, turn the power switch to off. Pull out drain handle and drain the cleaning solution from the vat and dispose. See Chick-fil-A™ guidelines for proper disposal of water and cleaner. An E-15 code displays indicating the drain is open. Take drain pan and basket support to sink to be cleaned.
- Re-install the drain pan under the fryer.
- Close drain and refill the vat with 7-8.5 gallons of cold water.
- If a high alkaline cleaner is used during the clean-out procedure, add approximately 8 ounces of distilled vinegar and re-start the Clean-Out Mode. Refer to the cleaner product label for rinsing procedure.
- Using a clean brush, scrub the interior of the vat to neutralize the alkaline left by the cleaning compound.
- Drain the vinegar rinse water into the drain pan by pulling the drain handle. Close the drain after pot has emptied.
- Remove the drain pan with the water/vinegar solution and dispose down the drain. Place the drain pan assembly back under the fryer.
- Perform a final rinse of the vat. Drain the water into the drain pan by pulling the drain handle. After the rinse water has drained, close the drain valve, remove the drain pan assembly and discard rinse water.
- Dry the drain pan and vat thoroughly. Install the basket support.
- Make sure drain is closed and return filter pan assembly, with new filter envelope, to the fryer. Fill the vat with oil following the Filling or Adding Oil instructions.
|
NOTICE - |
To avoid equipment damage: do not use corrosive cleaners on the lid or lid hinge; do not use a metal scraper below the crackling ring. |
|
NOTICE - |
Watch the cleaning solution constantly to make sure it does not boil over causing damage to controls. If the cleaning solution in the vat starts to foam and boil over, immediately turn the POWER Switch to OFF or damage to components could result. |
Best Practice: Make sure the vat and all components of the drain pan are completely dry before adding oil. This keeps oil from quickly degrading and ensure that oil will flow through the filter in the drain pan.
Note: After completing a Clean-Out Mode, the controls assume fresh oil is now in the vat and adjust the temperature accordingly. If the Clean-Out Mode was aborted before starting the 15 minute cook cycle or if fresh oil is not in the vat, set the controls to NEW or USED oil per Manually Setting New Or Used Oil.
Daily Cleaning
Clean between and behind the CFE 415 and adjacent PFE 500 to remove oil accumulation and debris daily.
- Place the vat cover over the vat of the CFE 415 and close the lid on the adjacent PFE 500 to keep oil from splashing out of the vat.
- Carefully roll the pair of fryers forward and separate the CFE 415 from the PFE 500 from the front of the unit.
- Remove all oil accumulation between the fryers and then clean behind the fryers to remove any oil accumulation and debris.
- Join the two fryers and gently roll back into position to avoid oil splashing.
Weekly Reserve Oil Tank Cleaning
Remove/Clean the reserve oil tank by following these instructions:
- Pull the reserve oil tank forward until it stops.
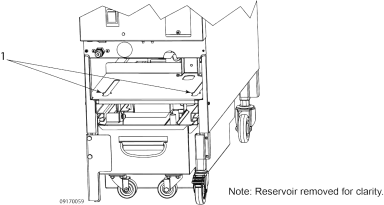
- Push back and lift up on the tank slightly until the studs in the bottom of the tank disengage from the slots (1) in the shelf.
- Discard any remaining oil from the tank to an approved oil disposal unit.
- Clean the interior and exterior of the reserve oil tank at a sink with soap and water.
- Clean the reserve oil tank shelf
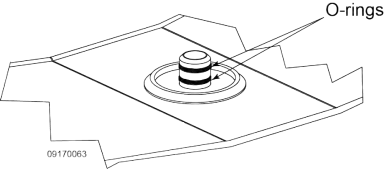
- Replace any damaged, or missing O-rings on the reserve oil tank.
- Lubricate O-rings with new oil before placing the reserve oil tank back into position.
- Place the reserve oil tank onto the shelf. Ensure the studs on the bottom of the reserve oil tank are aligned with the slots (1) in the shelf (see Figure 3-7 Reserve Oil Tank Shelf Slots, page 35).
- Gently push the reserve oil tank back until the tube is aligned with the receiver.
Info: Replace O-rings every 90-days to ensure consistent topping off of the vat. Use a small flat-blade screwdriver to pry up on the old O-ring and pull off end of tube. Roll new O-ring over tube until it snaps into O-ring groove on tube.
Quarterly Drain Pan O-ring Replacement
|
|
Burn Risk To avoid burns, use PPE when handling filter pan or filter pan lid. |
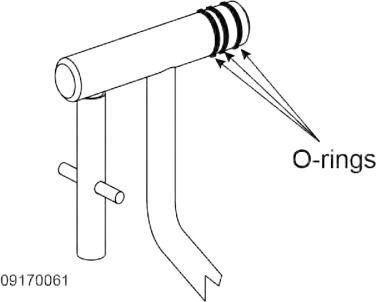
To prevent oil leaking, and to keep filtering process operating properly, the filter drain pan and filter screen O-rings should be replaced every three months.
- Push down on the drain pan latch and pull out the drain pan assembly, using the handle on the drain pan.
- Replace O-rings using a small flat-bladed screwdriver. Pry up on O-ring and pull off the end of tube.
- Roll new O-ring into notch on tube. Lubricate O-rings on filter tube with fresh, cold oil and push filter drain pan into position (lubricate first before installing).

Quarterly Filter Screen O-ring Replacement
|
|
Burn Risk To avoid burns, use PPE when handling filter pan or filter pan lid. |
To prevent oil leaking, and to keep filtering process operating properly, the filter drain pan and filter screen O-rings should be replaced every three months.
- Push down on the drain pan latch and pull out the drain pan assembly, using the handle on the drain pan.
- Remove the contents from the drain pan (refer to Drain Pan Assembly) to access the Filter Screen.
- To replace O-rings, use a small flat-bladed screwdriver and pry up on each O-ring and pull off the end of tube.
- Lubricate O-rings on filter tube with fresh, cold oil and push filter drain pan into position.
- Roll new O-rings in to the notch on the tube.