Troubleshooting

To isolate a malfunction, proceed as follows:

  • Clearly define the problem (or symptom) and when it occurs.

  • Locate the problem in the Troubleshooting table.

  • Review all possible causes. Then, one-at-a-time, work through the list of corrections until the problem is solved.

  • Use the Diagnostic Mode to identify the problem and make possible adjustments.

Note: Call a qualified technician if issues are recurring.

Cooking

PROBLEM CAUSE CORECTION

Product color not correct:

Too dark (some batches)

  • Temperature programmed too hot
  • covering temperature sensor
  • Breading product too far ahead
  • Done alarm ignored for more than 20 seconds
  • Wrong product button pressed
  • See Diagnostic Mode D10: if temperature settings have been changed, have the controls reinitialized.

  • Bread product just before frying

  • If the fryer hasn’t been used since the problem batch, see Information Modes 4 H and 5 H; for more information on this problem, see Information Modes 6 U, 7 U, 8 R, 9 R, or 10 R

  • Be sure to press the correct product button; if the fryer hasn’t been used since the problem batch, see Information Modes 4 B and 5 B, to see what product was selected

Too dark (all batches)
  • Temperature probe out of calibration

  • Oil too old

  • Oil too dark

  • Faulty probe: E6

  • See Diagnostic Mode D1: to adjust color of product

  • Check temperature probe calibration; see Checking Temperature Probe Calibration Section; if less than 15 degrees off, have probe calibrated; if more than 15 degrees off, replace probe

  • If oil is smoking or has burnt taste, change oil

  • See Diagnostic Mode D2: change oil if controls indicate it should be changed

  • Filter oil

  • Change oil

  • If probe can’t be re-calibrated, have probe replaced does not reset, high limit must be replaced

Too light (all batches)
  • Temperature probe out of calibration

  • Slow fryer heat-up / recovery

  • Oil usage wasn’t set for new oil

  • See Diagnostic Mode D1 to adjust color of product

  • Check temperature probe calibration; see Checking Temperature Probe Calibration Section; if less than 15 degrees off, have probe calibrated; if more than 15 degrees off, replace probe

  • See Diagnostic Mode D4, for present day’s performance; or see Information Modes 5, 6, 7, 8, 9, and 10 for more information on this problem

  • Low voltage; see Diagnostic Mode D3 for present day’s voltage performance; for more information see Information Modes 4, 5, 6, 7, 8, 9, 10 &16

  • See Diagnostic Mode D2 for the age of the oil; see Basic Operations Section for setting the age of the oil

Too light (some batches)
  • Temperature programmed too low
  • Product placed in oil before proper temperature
  • Wrong cook button pushed
  • Cook Cycle aborted before alarm and “DONE” flashes
  • Too large of a product batch
  • See Diagnostic Mode D 10 if temperature settings have been changed without authorization, have the controls reinitialized

  • If fryer hasn’t been used since problem batch, see Information Mode 4 C and 5 C; for more information see Information Modes 6 S, 7 S, 8 P, 9 P, and 10 P

  • If fryer hasn’t been used since problem batch, see Information Modes 4 B and 5 B to see what product was selected probe replaced does not reset, high limit must be replaced

  • No more than 15 lb (6.8 Kgs) of product per-batch; see Diagnostic Mode D 5 to see if the controls sensed any overloaded batches

Dryness of product
  • Moisture loss prior to cooking

  • Over-cooking the product

  • Time of cook eycle set too long

  • Wrong product button pushed

  • Use fresh product

  • Cover product with plastic wrap, reducing evaporation

  • Done alarm ignored for more than 20 seconds if the fryer hasn’t been used since the problem batch, see Information Modes 4 H and 5 H; for more information on this problem, see Information Modes 6 U, 7 U, 8 R, 9 R, or 10 R

  • See Diagnostic Mode D2 for the age of the oil; see Basic Operations Section for setting the age of the oil

  • See Diagnostic Mode D10; if time settings have been changed, have the controls reinitialized

  • If fryer hasn’t been used since problem batch, see Information Modes 4 B and 5 B to see what product was selected

Burned taste

  • Burned oil flavor

  • Shortening needs filtering

  • Vat not properly cleaned

  • Replace oil

  • Filter oil more often

  • Drain and clean the vat

Product not done
  • Cook Cycle aborted before alarm and “DONE” flashes

  • Too large of a product batch

  • Wrong cook button pushed

  • Temperature programmed too low or not programmed properly

  • Temperature probe out of calibration

  • Slow fryer heat-up / recovery

  • See Diagnostic Mode D7 to see how many times the Cook Cycle was stopped before the end of the cycle

  • No more than 15 lb (6.8 Kgs.) of product per batch; see Diagnostic Mode D5 to see if the controls sensed any overloaded batches

  • If fryer hasn’t been used since problem batch, see Information Modes 4 B and 5 B to see what product was selected

  • See Diagnostic Mode D10: If temperature settings have been changed, have the controls reinitialized Check temperature probe calibration; see Checking Temperature Probe Calibration Section:

    a. If less than 5° off, see Diagnostic Mode D1

    b. If between 5 and 15 degrees off, calibrate probe; if more than 15 degrees off, replace probe

  • See Diagnostic Mode D4, for present day’s performance; or see Information Modes 5, 6, 7, 8, 9, and 10 for more information on this problem

  • Low voltage; see Diagnostic Mode D3 for present day’s voltage performance; for more information see Information Modes 4, 5, 6, 7, 8, 9, 10 &16

Power

PROBLEM CAUSE CORECTION

With POWER switch

in ON position,

fryer is completely

without power

  • Open circuit

  • Check to see if fryer is plugged in

  • Check wall circuit breaker or fuse

  • Have a qualified service technician check power supply and POWER switch

Filter System

PROBLEM CAUSE CORECTION

Filter motor runs but

pumps oil slowly

  • Pump clogged

  • Filter line connection loose

  • Solidified oil in lines

  • Have pump cleaned

  • Tighten all filter line loose connections

  • Clear all filter lines of solidified oil

FILTER PUMP switch on,

motor does not run

  • Defective FILTER PUMP switch

  • Defective motor

  • Motor thermal protector tripped

  • Have switch checked

  • Have motor checked

  • Reset thermal protector per Filter Pump Motor Filter Protector Section

Motor hums

but will not pump

Clogged lines or pump removed
  • Have pump and lines and cleaned

  • Have pump seal, rotor and rollers replaced

Slow pumping oil or

air in filtration lines

  • Plug-in-play not properly seated.

  • O-rings not properly seated.

  • Inspect plug-in-play to ensure all O-rings are present and properly seated.

  • Connect plug-in-play and verify it is properly seated.

Filter Pump Motor Manual Reset

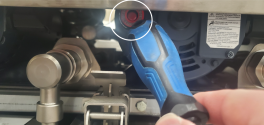
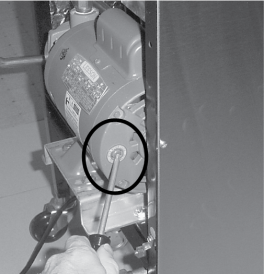
The filter pump motor is equipped with a manual reset button, located on the rear front of the motor, in case the motor overheats. If motor won’t run, wait about 5 minutes before attempting to reset this protective device to allow motor to cool. Remove the access panel on the left side panel of the unit to reset the button. It takes some effort to reset, and a screwdriver can be used to help reset the button.

Burn Risk

To avoid burns, turn POWER switch to OFF before resetting pump motor.

Heating Oil

PROBLEM CAUSE CORECTION

Oil will not heat

  • Blown fuse or tripped circuit breaker at supply box

  • Faulty cord and plug

  • Faulty PC board

  • Faulty or tripped high limit; “E10”

  • Drain valve open; “E15”

  • Possible faulty probe; “E6”

  • Possible faulty contactor

  • Reset breaker or replace fuse

  • Check cord and plug and check power at wall receptacle

  • Have control panel checked

  • Reset high limit per Operating Components Section; if high limit doesn’t reset, have it checked

  • Close drain valve

  • Have temperature probe checked

  • See Diagnostic Modes D4; if “CHECK COILS, CONTACTORS AND WIRING” shows on display, have contactors and wiring checked

  • Faulty POWER switch

  • Faulty drain switch; “E15”

See Information Mode 11 and check to see if the input code is present; if not, have fryer checked by a certified service technician

Oil heating slowly

Low or improper amps See infomation Mode 17 for present amperage; or see Information Modes 4, 5, 6, 7, 8, 9, and 10 for more information on this problem. Diagnostic Mode D4 gives present day’s heating performance
  • Low or improper voltage

  • Wire(s) loose

  • Faulty PC board

  • See Diagnostic Modes D3 & D4 for present day’s voltage and heating performance; or see Information Modes 4, 5, 6, 7, 8, 9, 10 and 15 for more information on this problem

  • Have wires tightened

  • Have control panel checked

  • Weak or burnt out elements (elec. model)

  • Burnt or charred connectors

  • Faulty contactor

See Diagnostic Modes D4; see if “CHECK COILS, CONTACTORS AND WIRING” displays; if so, have fryer checked by a certified service technician