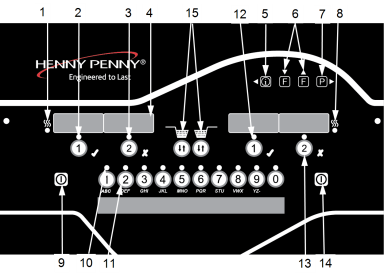
Operating Components
Controls

|
|

|
|
Item No. |
Description |
Function |
|---|---|---|
|
1 |
Left Heat LED |
This LED lights when the control calls for heat for the left vat |
|
2 |
Left Timer 1 Button |
During normal operation, press this button to start and stop cook cycles for the left basket; press to change displayed product; also used for “✓” to indicate yes or to confirm. |
|
3 |
Left Timer 2 Button |
During normal operation, press this button to start and stop cook cycles for the left basket; press to change displayed product; also used for “X” to indicate no or cancel. |
|
4 |
Digital Display |
Shows the product codes; shows the timer countdown during cook cycles; shows the selections in the program mode; shows the temperature of the oil by pressing the info button; shows error codes (also displays in several languages). |
|
5 |
Info Button |
Press once to view actual oil temperature; press twice to view oil set-point temperature; press three times to view recovery information for each vat from 250°F to 300°F (121°C to 149°C). Used in programming modes; used as button to back up to a previous parameter in program and filter modes. |
|
6 |
Filter Button |
Used to access the filter menu; also used for the up and down arrow buttons; press once to view the number of cook cycles before next filter in Global Filter or the mode percentage of filter allowance in Mixed Filter; press twice to view the time and date of the most recent filter on each vat; press three times to view the number of hours of use of the filter pad presently in the filter pan. |
|
7 |
Program Button |
Used to access the program modes; used as the right arrow button to advance to the next parameters in program and filter mdoes; press to select 2nd language and volumes |
|
8 |
Right Heat LED |
This LED lights when the control calls for heat for the right vat |
|
9 |
Left Heat Button |
Press to turn on and off the heat system for the left vat(s); on full vats either heat button can be used. |
|
10 |
Product LED |
Each product button LED lights when that particular product has been selected, or when it is compatible with cook temperature. |
|
11 |
Product Button |
Press to select the desired product; press to place the letters under the button during naming a product in program mode. The 0 product button can be used to start an idle mode if enabled in special program mode. |
|
12 |
Right Timer 1 Button |
During normal operation, press this button to start and stop cook cycles for the right basket; press to change dis- played product; also used for “✓” to indicate yes or to confirm. |
|
13 |
Right Timer 2 Button |
During normal operation, press this button to start and stop cook cycles for the right basket; press to change displayed product; also used for “X” to indicate no or cancel. |
|
14 |
Right Heat Button |
Press to turn on and off the heat system for the right vat (s); on full vats either heat button can be used. |
| 15 | Auto-Lift Buttons | Auto-lift equipped fryers ONLY. Press to raise or lower baskets. |
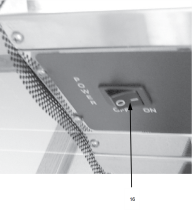
| 16 |
Filter Beacon® |
A Filter Beacon® is found beside each black drain knob; when lit blue, indicates the oil should be filtered at this time; beacon flashes when the drain needs opened or closed. |
| 17 |
Power Switch |
When the power switch is turned to the on position, power is supplied to the controls and pumps. |
| 18 |
Filter Switch |
For fryers with a bulk oil supply, press this button to fill the BIB. |
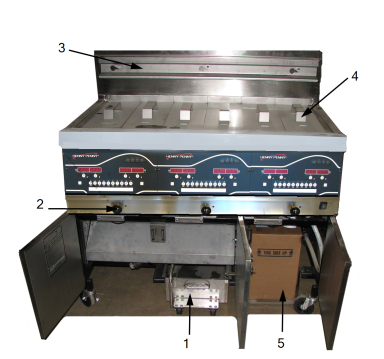
Unit Components
|
Item No. |
Description |
Function |
|---|---|---|
|
1 |
Filter Pan Assembly |
Oil is drained into this pan and then is pumped through filters to help prolong the use of the oil. |
|
2 |
Drain Valve Knob (Optional) |
Pull out on black knobs to open drain valve and oil drains from vat; puush in to close drain valve and oil can be pumped into vat. |
|
3 |
Basket Rest |
The baskets hang on this when not in use, or to drain the product after a cook cycle. |
|
4 |
Vat Covers |
Covers the vat when not in use. |