Installation and Start-Up
Both the installation and start-up training for your new fryer are handled by your local Henny Penny distributor. Installation is typically performed just before your start-up training and includes, but is not limited to the following steps:
-
Ensure all packaging is removed from the drain pan and fryer.
-
Wipe out and rinse each vat removing all liquids once clean.
-
Assemble the drain pan.
-
Manually fill each vat with oil.
-
Install a fresh JIB under the primary vat.
-
Perform control setup.
-
Test each system on the fryer.
The touchscreen controls need to be set up the first time they are turned on. Control setup is completed by your local Henny Penny distributor during the installation of your fryer. Control setup also needs to be performed in the event a control is replaced, or a factory reset is applied.
IMPORTANT! Control setup needs to be completed from controls left to right. All controls must go through the start up process before fryer is put into operation.
Note: The below options can be accessed and changed from the Settings menu. Type password 1122 if needed.
Options can always be changed in the General Settings. To set up a new control or a control where a factory reset is applied, perform the following steps:
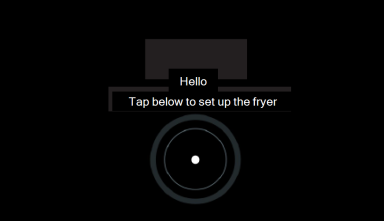
Turn the main power switch on. Hello displays.
Tap the pulsing circle on the control screen to get started.
Tap and set preferred Language, and then tap Next (->) to proceed.
Tap the Serial Number, and then use the on screen keyboard to type your serial number. The serial number can be found on the inside of the door, on the Data Plate. If the serial number displays automatically, tap Next (->) to proceed.
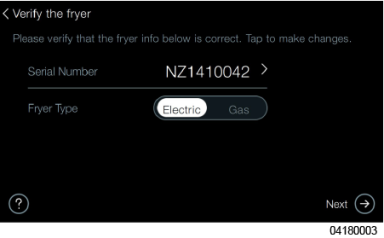
The system auto-detects the Well Set Up and settings display in green. Only troubleshoot and correct setting which display in red. Tap Next (->) to proceed.
Tap to select your region (Zone), and then tap Next (->) to proceed.
Note: Not selecting a zone can impact menu updates.
Zone1 – US
Zone2 – Europe
Zone3 – AU/NZ
Zone4 – Other
Tap and set preferred Time Settings, and then tap Next (->) to proceed.
Tap and set preferred Date Settings, and then tap Next (->) to proceed.
Tap and set preferred Temperature Units, and then tap Next (->) to proceed.
Tap and set preferred Home Screen Layout, whether Classic (Icon list) or Gallery (Carousel), and then tap Next (->) to proceed.
Tap and set preferred Screen Brightness, and then tap Next (->) to proceed.
Note: The useful life of the display decreases the higher the brightness setting.
Tap and set preferred Dispose Configuration, and then tap Next (->) to proceed.
Tap and set preferred Oil Configuration, and then tap Next (->) to proceed.
Tap and set preferred Express Filter Alerts, and then tap Next (->) to proceed.
Tap and set preferred Daily Maintenance Filter Alert, and then tap Next (->) to proceed.
Tap and set preferred Filter Tracking Mode, and then tap Next (->) to proceed.
Tap and set preferred Deep Clean Alert, and then tap Next (->) to proceed.
Tap and set preferred Volume, and then tap Next (->) to proceed.
Tap and set Your passcode, factory is 1234, and then tap Next (->) to proceed.
Tap and Create Food Item or Import Food Items, and then tap Next (->) to proceed. Get Started displays.
Note: You may Skip (->) this step and return later.
Skip Get Started by tapping Later (->). The control reboots to the Preheat screen.
Purge Oil Lines
Before filling each of the vats with frying oil for the first time, purge the oil lines to ensure all water or mineral oil is removed. Also wipe out the vat to remove mineral oil, dust or other debris.
NOTICE - | Mineral oil will contaminate cooking oil, causing excessive foaming and poor food quality. If mineral oil is not fully removed before filling the fryer for the first time, the cooking oil must be replaced immediately. To protect the fryer and achieve the best cooking results, carefully complete the following steps to fully remove mineral oil from all lines before adding fresh oil. |
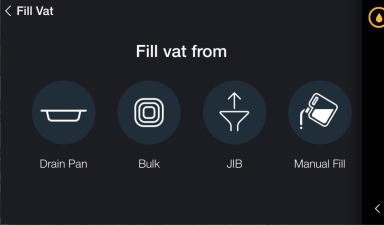
Quick navigation: Settings > Oil & Filter > Fill Vat > JIB
![]()
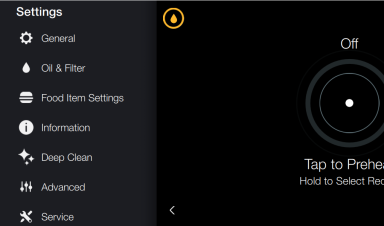
Tap the Settings Menu icon. Settings display.
Tap Oil & Filter. The Oil & Filter menu displays.
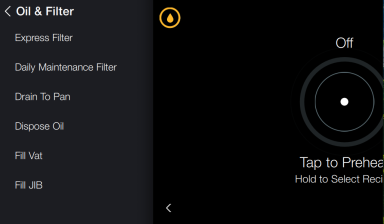
Tap Fill Vat. The Fill Vat menu displays.
Tap JIB. The Fill from JIB menu displays.
Tap Fill and hold until clean oil begins to fill vat. Mineral oil and water in the lines will purge into the vat.
Tap Done. Control exits to Preheat menu.
Wipe out the vat thoroughly and remove all mineral oil and water.
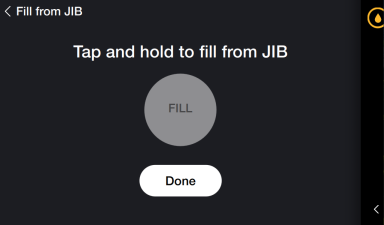
IMPORTANT: DO NOT fill vat. Once clean oil begins to fill vat, STOP.
Start-up Training
Start-up training ensures you and your team understand operation and maintenance of your fryer.
Your local distributor will provide start up training.