|
|
|
Changing the Filter Pad
In order to assure good oil pumping performance, the filter pad (or paper) should be changed at least once per day. However, in stores open 24 hours a day, the pad should be changed twice a day.
If the filter pad has not been changed, a reminder shows on the display, “CHANGE PAD”. Press the Confirm button to cancel the message, but it reappears every 4 minutes until the filter pad has been changed.

|
Burn Risk To avoid burns, use PPE when handling filter pan or filter pan lid. |
-
Ensure the main power switch is in the ON position.

-
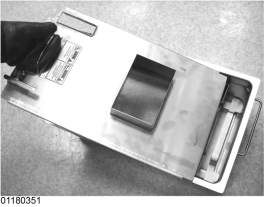
Open the door, lift-up on the filter pan stop and pull-out the filter pan assembly, using the handle on the filter pan.
-
Lift the pan cover from the filter pan.
-
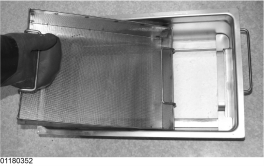
Lift the crumb basket from the filter pan. Wipe the oil and crumbs from the crumb basket. Clean the crumb basket with soap and water, then thoroughly rinse with hot water.

-
Remove the filter pad or filter paper retaining ring and clean thoroughly with soap and water. Rinse thoroughly with hot water.

-
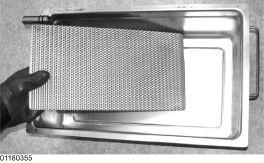
Pull the filter pad or filter paper, if applicable, from the pan and discard.
-
Remove the bottom screen from pan and clean thoroughly with soap and water. Rinse thoroughly with hot water.

-
Wipe the oil and crumbs from the filter pan. Clean the filter pan with soap and water, then thoroughly rinse with hot water.
NOTICE -
Thoroughly dry all filter pan components before assembly.
-
Reassemble in reverse order, placing the bottom screen into the filter pan first, followed by the filter pad, retaining ring and the crumb catcher.
NOTICE -
During installation and reassembly be sure to apply oil to all O-rings to lubricate and to help prevent tears and oil loss. Visually inspect O-rings and replace if worn or damaged.
Every 90 days replace O-rings. Remove O-rings from their groove and install new O-rings by gently rolling into place and lubricating with oil.
Use a small blunt object to gently pry O-rings from their groove to inspect for damage. Install by lubricating then gently rolling them in to place.
-
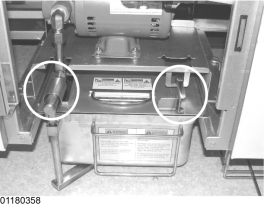
Push the filter pan assembly back underneath the fryer, ensuring the filter tube on the pan makes a good connection with the fitting underneath the fryer.
-
Ensure the filter pan stop is engaged and the fryer is now ready for normal operation.