|
|
|
Operating Components
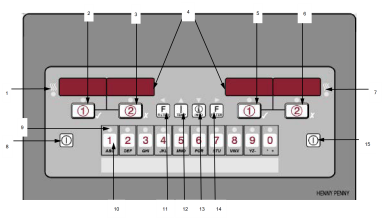
Controls and Indicators
| Item No. | Name | Function |
|---|---|---|
| 1 | Left Heat indicator |
This LED lights when the control calls for heat for the left vat(s), and the elements come on and heat the oil. |
| 2 |
Timer button 1 or Left Confirm button |
During normal operation, press this button to start and stop cook cycles for the left basket; press to change displayed product; also used to indicate YES or to confirm. |
| 3 |
Timer button 2 or Left Cancel button |
During normal operation, press this button to start and stop cook cycles for the left basket; press to change displayed product; also used to indicate NO or cancel. |
| 4 | Digital Display |
Digital Display Shows the product codes; shows the timer countdown during cook cycles; shows the prompts during the filter modes; shows the selections in the Program Mode; shows the temperature of the oil by pressing the Timer button; shows error codes (also displays in several languages). |
| 5 |
Timer button 1 or Right Confirm button |
During normal operation, press this button to start and stop cook cycles for the right basket; press to change displayed product; press to confirm prompts in the filter modes; also used for ✓ to indicate YES or confirmation |
| 6 |
Timer button 2 or Right Cancel button |
During normal operation, press this button to start and stop cook cycles for the right basket; press to change displayed product; press to deny prompts in the filter modes; also used for X to indicate NO or cancel |
| 7 | Right Heat indicator |
This LED lights when the control calls for heat for the right vat(s), and the elements come on and heat the oil. |
| 8 | Left Heat button |
Press to turn on and off the heat system for the left vat(s). |
| 9 | Product button indicator |
Each product button LED lights when that particular product has been selected. |
| 10 | Product button |
Press to select the desired product; press, during naming a product, to place the letters under the button, in the name. |
|
11 |
Left Filter button |
Used in the Programming and Filtering Modes; also used for or buttons ; press to view the following filtering stats: a. the number of cook cycles before next filter b. time and date of last filter cycle c. the number of hours the existing filter has been used |
| 12 | Temperature button |
Used in the Programming Modes; used in the Filtering Modes; used in filling and emptying the vats; also used for button; press to view the following temperature stats: a. actual oil temperature in each vat b. setpoint temperature for each vat |
| 13 | Information button |
Used in the Programming Modes; also used for button; press to display the following fryer information and stats: a. recovery information for each vat b. selected primary and secondary display languages |
| 14 | Right Filter button |
See 11 |
| 15 | Right Heat button |
Press to turn on and off the heat system for the right vat(s). |
|
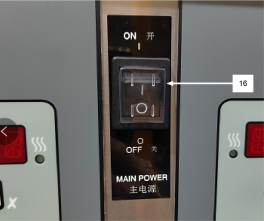
16 |
On/Off Rocker Switch |
When turned to the ON position, power is supplied to the controls and filter pumps. |
Unit Components

To compensate for spacing issues, the drain and return valve handles are located differently for fryers with split vats on the far right-hand side of the fryer.
| Item No. | Name | Function |
|---|---|---|
| 1 |
Filter Pan Assembly |
Oil is drained into this pan and then is pumped through filters to help prolong the use of the oil. |
| 2 |
Basket Rest |
The baskets hang on this when not in use, or to drain the product after a cook cycle. |
| 3 |
High Limit Switches |
Only on fryers that have the RTI System at the location. |
| 4 |
Vat Covers |
Covers the vat when not in use. |
| 5 |
Filter Valve Handles |
Yellow handles open & close filter valve when pumping oil into vat |
| 6 |
Drain Valve Handles |
Red handles open & close the drain valves. |
| 7 | Purge Handle | Turn black handle to cook position (open) during operation and turn it to the filter position (closed - shown above) during filtering. |