Changing the Filter Envelope
 | Burn Risk To avoid severe burns, turn off filter pump and wear personal protective equipment (PPE) when touching union on filter tube. |
If there are air bubbles coming up in the oil, it’s possible that the filter connection at the union on the filter tube is not tightened properly. If so, turn off the pump and wear PPE when tightening the union.
 | Burn Risk To avoid burns, use PPE when handling filter pan or filter pan lid. |
NOTICE - | To avoid equipment damage, do not clean stainless steel with abrasive tools, abrasive cleaners or corrosive chemicals. |
NOTICE - | Thoroughly dry all filter pan components before assembly. |
The filter envelope should be changed daily or if clogged. Proceed as follows:
- Move the main POWER switch to the OFF position.
- Disconnect the filter union and remove the filter drain pan from beneath the vat.
- Remove cover from filter drain pan and lift the filter screen assembly from the drain pan.
- Wipe the oil and crumbs from the filter drain pan. Clean the drain pan with soap and water. Thoroughly rinse with hot water.
- Unthread the standpipe from the filter screen assembly.
- Remove the crumb catcher and clean with soap and water. Rinse thoroughly with hot water.
- Remove the filter clips and discard the filter envelope.
- Clean the top and bottom filter screen with soap and water. Rinse thoroughly with hot water.
- Slide the screen into a clean filter envelope.
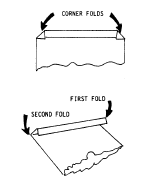
- Fold the corners in and then double fold the open end.
- Properly install paper envelope over the filter screens.
- Fold the open end of the envelope, and clamp with retaining clips so that crumbs cannot enter.
- Pump oil, until no oil is coming from the nozzle.
- Clamp the envelope in place with the two filter retaining clips.
- Replace the crumb catcher screen on top of the filter paper. Screw on the standpipe assembly.
- Place complete filter screen assembly back into filter drain pan, replace cover, and slide pan back into place beneath the open fryer.
- Connect the filter union by hand. Do not use a wrench to tighten.
- The open fryer is now ready to operate.
NOTE: Be sure that the filter screen, crumb catcher, filter clips and the standpipe are thoroughly dry before assembly of the filter envelope or water will dissolve the filter paper.
To help prevent filter pump problems: