|
|
|
Basic Operations
|
NOTICE - |
To avoid equipment damage, hold onto the lid as it opens. |
The following procedures should be followed on the initial start up of the fryer, and each time the fryer is brought back into operation from a cold or shut down condition. These are basic, general instructions.
-
Ensure the drain valve is in the closed position. Note: The drain valve is automatic.
-
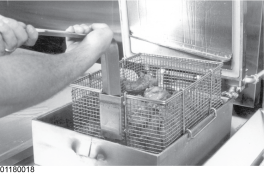
Remove fry basket from vat and leave lid up.
-
Fill the vat with oil.
-
Move power switch to the ON position. Unit automatically goes into the Melt Cycle. When the temperature reaches 215°F (102°C), the control goes into the Heat Cycle and heats the oil until the temperature setting is reached.
(missing or bad snippet)
To avoid personal injury and fire, ensure that oil completely covers heating elements
Do not bypass the Melt Cycle. The type of oil being used in the fryer determines the amount of heat applied during the Melt Cycle. If the controls are set to the Solid setting, less heat is applied to the solid oil than if the controls were set to Liquid. Too much heat applied to solid oil causes much smoking, and could cause a fire. Match this setting to the type of oil being used at the time. When using new solid oil, it is recommended to melt the solid oil on an outside source before placing oil in the vat.
NOTICE -
Solid oil is not recommended as it can cause clogging and pump failure.
-
Completely stir oil to stabilize the temperature throughout the vat. Be sure to stir down into the bottom of the vat.
(missing or bad snippet) -
If the oil was not filtered the night before at shutdown, it should be filtered now, after the oil reaches the frying temperature and before the fryer is used. Refer to Filtering the Oil.
-
Follow the steps in Chick-fil-A's training materials to load the product.
-
Lower the tier basket (filets) or large basket (nuggets) into the vat. Follow Chick-fil-A's procedure for stirring nuggets to separate pieces.
-
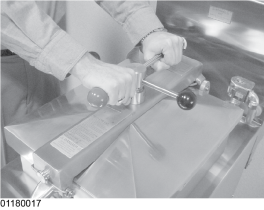
Remove basket handle and close lid quickly, latching the lid.
-
Tighten the lid spindle clockwise, sealing the lid. Align red knob on the spindle with red knob on latch.
-
The lid must be fully closed and sealed prior to starting a cook cycle.
-
Do not operate unit without all lid components installed and lid cover in place.
-
Do not tamper with any component of the lid’s locking mechanism.
-
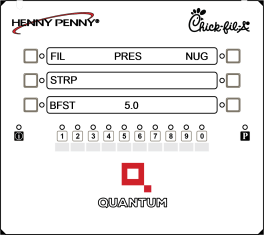
Press the menu button to start a Cook Cycle. The display counts down the cooking time.
To check the oil temperature, press the [I]nfo button. To stop a Cook Cycle, press and hold the "X" button.
-
Within a few minutes, the pressure gauge increases to the Operating Zone. If it does not, recheck the procedures and then refer to Troubleshooting.
-
When the cook cycle is done, press the Stop button (black square icon) at the upper right.
-
When the pressure is less than 1.5 psi, it will begin the end-of-cycle beeping. Unscrew the lid, unlatch, and raise the lid quickly to allow most of the condensation on the lid to drain through the drain channel and not into the oil.
-
Using the detachable handle, lift the basket and hang it on the side of the vat to drain. Dump product into holding pan.

|
Burn Risk To avoid severe burns: |
|
NOTICE - |
To avoid damage, do not flip or spin the spindle cross arm when opening the lid. Use both hands when turning the cross arm. |
|
NOTICE - |
To avoid damage, do not allow the lid to hit the backstop with excessive force. |