
|
Burn Risk Do not close lid with water and/or cleaner in vat. Water under pressure becomes superheated. When lid is opened, escaping water and steam can result in severe burns. |

|
To avoid personal injury, always wear PPE when cleaning vat and follow instructions on the cleaning solution. |
Always wear chemical splash goggles or face shield and protective rubber gloves when cleaning the vat as the cleaning solution is high in alkaline. Avoid splashing or other contact of the solution with your eyes or skin. If solution comes in contact with your eyes rinse thoroughly with cool water and see a physician immediately.
|
|
To avoid personal injury from falling lid, fully engage tilt stop while cleaning and servicing lid. Lid may fall with force if tilt stop is not engaged. |
|
NOTICE - |
To avoid equipment damage, do not clean stainless steel with abrasive tools, abrasive cleaners or corrosive chemicals. |
|
NOTICE - |
To avoid equipment damage and ensure lid seal, do not strike tools on vat band or vat rim. |
|
NOTICE - |
To avoid damaging elements, do not scrape or scrub with abrasive tools or pads. Scratches on the elements may cause breading to stick to them and burn. |
|
NOTICE - |
To avoid component damage, do not use pressurized water or a steam cleaner to clean unit.
|
After the initial installation of the fryer and during every oil change, the vat must be thoroughly cleaned. There are two ways to clean the vat using the clean-out mode, heated and cold soak. Operators can fill the vat with warm water and cleaning solution, enable heat, and then scrub the vat immediately (P.M.) or let it soak overnight cold and scrub it in the morning (A.M.). Cleaning the vat immediately is called a Heated Clean-Out and allowing the vat to soak overnight is called a Cold- Soak Clean-Out. The choice of which type of clean-out an operator uses is set during installation within the software settings. Refer to Drain and dispose of the oil before performing these procedures.
Note: Give extra attention to cleaning the fasteners on the heating element bracket to ensure that no build up remains in the pockets of the screws.
Setting the Clean-Out Mode Type
Operators can choose between a Heated and a Cold-Soak clean-out. Select a clean-out mode SP-22 through SP-24 in Special Programming.
Clean-Out Menu Overview
Select the 1. FILTER menu, and then press the Main menu button twice to select 8. CLEAN-OUT and perform clean out tasks.
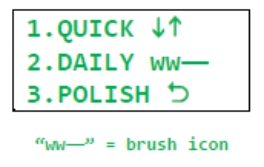
Menu (screen) 1
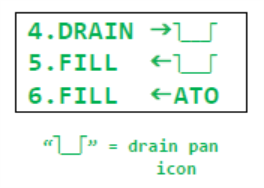
Menu (screen) 2
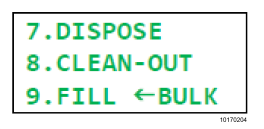
Menu (screen) 3
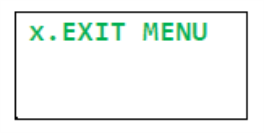
Menu (screen) 4
Use the following steps to access the Clean-Out menu. An indicator light displays next to active options during procedure.
-
If necessary, drain and dispose of the old unusable oil.
-
Press and hold the Main menu button until *MAIN* displays. The Main menu displays.
-
Press the 1. FILTER button. Additional menu items display.
-
Press the Main menu button twice. The 8. CLEAN-OUT menu displays.
-
Press the 8. CLEAN-OUT button. =CLEAN OUT= HAS OIL BEEN REMOVED? YES NO displays.
-
Press YES. IS VAT FILLED WITH WATER & CLEANER? displays.
-
Proceed to Perform the Clean-Out Preparation.
Perform the Clean-Out Preparation
-
Lift and secure the lid. Refer to Lifting and Securing the Lid for instructions.
-
Remove the
-
Fill the vat with warm water half way to the oil level indicators. This can be done with a 5 gallon bucket or water hose connected to a spigot.
-
Add 8 to 10 ounces of fryer cleaning solution.
-
Continue to Perform the Cold-Soak Clean-Out.
Clean Racks
-
Place racks in wash compartment of the sink filled with fresh hot water and cleaning solution.
-
Use small wares cleaning brush to scrub the wire racks.
-
Rinse and allow to air dry.
Perform the Cold-Soak Clean-Out
This procedure requires that the water stays in the vat overnight to soak off the crusty debris on the side of the vat.
-
If necessary, press the OFF button to power off the unit.
-
Allow the vat, filled with water and cleaner, to soak as long as necessary (overnight).
-
Use a scrub brush/pad on the vat walls to loosen any crumbs or debris.
-
Carefully clean the elements with a thin scrub brush.
-
Scrub the underside of the lid.
-
Remove and clean the lid gasket.
-
When completely scrubbed clean, press the DONE button. DONE SOAKING?, YES and NO displays.
-
Press YES, and then press the next► button.
-
Proceed to Drain the Water.
Give extra attention to cleaning the fasteners on the heating element bracket to ensure that no build up remains in the pockets of screws.
Perform the Heated Clean-Out
This procedure requires immediate cleaning without soaking overnight.
-
If necessary, press the ON button to power on the unit. =CLEAN OUT= HEATING 78F x! displays.
-
WAIT. The temperature rises to 194°F, and then a 15:00 minute timer starts with a beeper sounding. =CLEAN OUT= cleaning displays.
-
Use a scrub brush/pad on the vat walls to loosen any crumbs or debris.
-
Carefully clean the elements with a thin scrub brush.
-
Scrub the underside of the lid.
-
Remove and clean the lid gasket.
-
The time on the timer runs out. =CLEAN OUT= *DONE*, and then TURN FRYER OFF displays.
-
Press the power off button. =DRAIN= DRAIN (hold) and next► displays.
-
Proceed to Drain the Water.
Give extra attention to cleaning the fasteners on the heating element bracket to ensure that no build up remains in the pockets of screws.
Drain the Water
A bucket, tub or the drain pan needs to be in place under the drain before proceeding to draining. If using the drain pan, remove all the internal parts so the pan is empty. Do not put the lid on the pan it must remain open for this procedure.
-
Press and hold the ▼DRAIN (hold) button. Draining water, and then drain small amount to pan and then dump displays. The water drains in to the bucket/tub/ pan.
-
When the bucket/tub/pan is partially full, release the button and the water stops draining.
-
Remove the bucket/tub/pan from under the fryer and dispose.
-
Repeat steps 3 and 4 in this section until the vat is completely drained.
-
Press the next► button. IS POT EMPTY? displays.
-
Confirm all the water is drained from the vat, and then press YES.
-
Proceed to Rinse the Vat With Clean Water.
Rinse the Vat With Clean Water
During this procedure when the drain is open, all the water, cooking debris, and cleaner exits the bottom of the unit. The control board does not regulate, warn or display the amount of flow through the unit in to the bucket/tub/pan, this must be done manually. Do not overflow the bucket/tub/pan.
Note: Some fryer cleaning solutions require a vinegar rinse. Please check product instructions.
-
Ensure the bucket/tub/pan is under the drain. ▼OPEN DRAIN displays.
-
Press ▼OPEN DRAIN. The drain opens.
-
Use clean water to rinse the side walls and bottom of the vat.
-
Stop when the bucket/tub/pan is full or the unit is rinsed clean.
-
Press the ►◄CLOSE DRN button.
-
Remove the bucket/tub/pan from under the fryer and dispose.
-
Repeat steps 2 through 5 until the vat is rinsed clean of cooking debris, cleaner and dirty water.
-
Press the ►◄CLOSE DRN button.
-
Ensure the bucket/tub/pan is under the drain. 10)Press the next► button. =PURGE= ►PUMP displays. 11)Proceed to Purge the Oil Lines.
Purge the Oil Lines
Clear dirty, unusable oil, water and debris from the oil lines by doing the following:
-
Confirm the fresh oil tank has new oil in it.
-
Press and hold the ►PUMP button until clean, fresh oil comes through the two inlets in the bottom of the vat.
-
To clear the oil from the vat, refer to Rinse the Vat With Clean Water.
-
Once the vat is rinsed, press the next► button. ==WIPE== ▼OPEN DRAIN display.
-
Proceed to Wipe the Vat
Wipe the Vat
-
Place a bucket/tub/pan under the fryer.
-
Press the ▼OPEN DRAIN button.
-
Use a clean towel to wipe the sides and bottom of the pot. Guide all the remaining water and debris down the drain.
-
Press the ►◄CLOSE DRN button to close the drain.
-
Remove the bucket/tub/pan from under the fryer and dispose.
-
Press the next► button. EXIT CLEAN-OUT? displays.
-
Proceed to Exit Confirmation.
Exit Confirmation
-
If the clean-out process is completed, press the YES button. If the drain is open, the control board automatically closes the drain. KEEP OFF UNTIL FILLED displays.
-
If the power switch is in the ON position, move it to the OFF position to power off the unit.
-
Fill the vat with fresh oil to the lower oil indicator line on the side of the vat.
-
Once the vat is filled with fresh oil, the fryer is ready for normal operations.