Product Programming Menu
From the MAIN menu select 4. PROG, and then 1. PRODUCTS. Refer to Main Menu. Access the Product Programming menu by doing the following:
- Press and hold the menu button until *MAIN* displays.
-
Select 4. PROG.
-
Type 123. The 1. PRODUCTS menu displays.
-
Select 1. PRODUCTS. The Products menus display.
-
Use the left or right arrow to navigate through the options.
This section describes how to program a new product into an empty slot or override a current product.
-
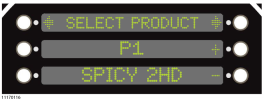
Press the + or - button to scroll through the list to create or select a product to program.
-
Press the right-arrow to program the selected product.

-
Press ◄ CHANGE to create a name. The name becomes the displayed title.
-
Press the left or right arrows to navigate screens 1 through 5.

-
Press the displayed number buttons to select an option.
-
Press the button to confirm completion.
-
Press the right-arrow button. LINK ID displays. The Link ID is an abbreviation for the cook menu.

-
Change the Link ID by pressing the ◄ change button.
-
Press the number buttons to set the name.
-
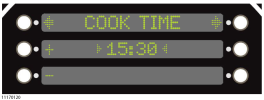
Press the right-arrow button. COOK TIME displays.
-
Press the number buttons to set the cook time.
-
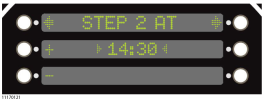
Press the right-arrow button. STEP 2 AT displays. STEP 2 AT determines the time the next Set Temperature settings activate.
-
Press the number buttons to set the time.
-
Press the right-arrow button. STEP 3 AT displays. Enter 0:00 at anytime and this automatically ends the cook cycle.

-
Use the right-arrow button. TEMP 1 displays.

-
Press the number buttons to set the temperature.
-
Press the right-arrow button. TEMP 2 displays.

-
Press the number buttons to set the temperature.
-
Press the right-arrow button. ALARM 1 displays.

-
Press the number buttons to set the alarm.
-
Press the right-arrow button. LOAD COMP displays.
-
Press the number buttons to set the LOAD COMP (Load Compensation) value.
NOTE: A setting of 0 disables the Load Compensation feature.
-
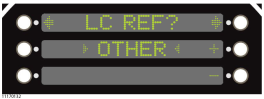
Press the + or - button to set the LOAD COMP REF (Load Compensation) to SETPT (Setpoint) or OTHER.
-
If OTHER is selected, press the right- arrow button and continue at step 24. LC REF TEMP displays.
-
Otherwise continue at step 26.

-
-
Press the number buttons to set the temperature for the load compensation calculation to reference.
-
Press YES to confirm.
-
Press the right-arrow button. FULL HEAT displays.

Full heat is the amount of time the heat is applied full force (thermostatically) at the start of the cook cycle, before the control switches over to PC (pulsed control) heating.
-
Press the number buttons to set the time.
-
Press YES to confirm.
-
Press the right-arrow. PC FACTOR displays.
- Press the number buttons to set the temperature range for pulsed heating. Set to 0 for full heat. This is the number of degrees below setpoint during cooking at which pulsed heat is used, which can help avoid overshoots. The smaller the setting, the more it approaches thermostatic heat control.
-
Press YES to confirm.
-
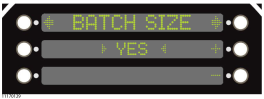
Press the right-arrow button. BATCH SIZE REQD displays.
-
Select YES, and the operator is prompted to enter a batch size after product is cooked.