|
|
|
Cleaning Deadweight - Monthly

|
To avoid personal injury:
|
|
|
The deadweight is not captive inside the steam stack and can fall out. Keep the steam stack in the upward orientation or the deadweight can fall out and may cause personal injury or damage to the deadweight. |

Remove and clean the deadweight monthly by performing the following maintenance procedure.
-
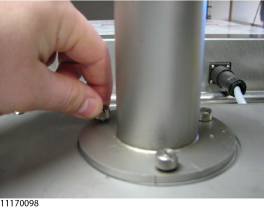
Loosen the 3 thumb screws that secure the steam stack to the top of the fryer.
-
Pull the steam stack out of the fryer revealing the deadweight.
-
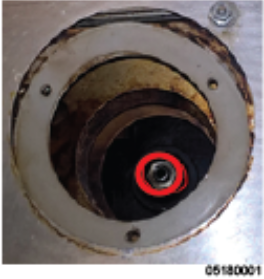
Clean out the steam stack and ensure any obstructions are removed.
-
Remove the orifice cleaning tool from the back of the fryer.
-
Insert the tool into the orifice and plunge up and down several times, as far as the tool can reach, to thoroughly clean out the orifice.
NOTICE -
Do not use side to side motion or apply pressure when using the deadweight orifice cleaning tool.
-
Use a towel to wipe any build up from the dead-weight and gasket.
-
Place the gasket onto the factory location, aligning the 3 screw holes.

-
Place the steam stack back into place and tighten the 3 thumb screws.
Clean the Lid Gasket - Monthly
|
|
To avoid personal injury, allow lid to cool before cleaning or removing the gasket.DO NOT REMOVE the gasket retainer screws or retainer to remove the gasket. Remove ONLY the gasket. Objects can fall and splash hot oil or hot water while performing this procedure. Cover the vat with a sheet pan or drain the vat and allow to cool otherwise serious burns may result. |
NOTE: Henny Penny recommends replacing the lid gasket if blackened, hardened or brittle and every 12 months as part of the fryer's maintenance schedule.
Clean the lid gasket every 30 days to prevent steam leaks and to ensure a tight lid seal. The fryer must pressurize quickly and fully to ensure proper cooking of the product. A poorly maintained fryer lid gasket can allow oil and water laden vapors to escape the lid, causing poor fryer performance as well as creating a danger to operators. This procedure may be performed in conjunction with a complete fryer cleaning.
Lifting and Securing the Lid
It is necessary to lift and secure the lid during some maintenance procedures. The lid must be secured using the tilt stop (kickstand) to prevent injury or damage.
-
Put on Personal Protective Equipment (PPE).
-
With both hands on the lid handle, lift the lid up until it is parallel with the backshroud. You will hear a click.
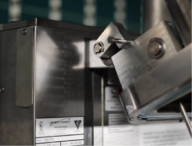
Engaged Tilt Stop
Disengaged Tilt Stop

-
Place both hands under the front corners of the fryer lid and lift up to tilt the lid back. Visually inspect to ensure the tilt stop position matches the Engaged Tilt Stop image. You will hear a click as the tilt stop engages.
-
When the tilt stop is engaged, you can safely remove your hands from the lid.
|
|
To avoid personal injury from falling lid, fully engage tilt stop while cleaning and servicing lid. Lid may fall with force if tilt stop is not engaged. |
Remove the Gasket
NOTE: A quick cleaning may be required prior to removing the gasket to aid in the removal process. Do not use a sharp tool to perform this procedure. Use care not to cut the gasket.
Pull the gasket out from the gasket retainer and inspect. If the gasket is:
-
12 months old or older, blackened, hardened or brittle order a new gasket.
-
Less than 12 months old, not blackened, hardened or brittle, proceed to Clean the Lid and Gasket.
Clean the Lid and Gasket
Cleaning the lid and gasket is a sanitary practice that keeps the oil and product cleaner. Removing cooked on oil and food debris also helps the lid and gasket seal tightly. Clean the gasket by doing the following:
-
Put on Personal Protective Equipment (PPE).
-
Using degreaser or hot soapy water scrub the gasket clean.
-
Use a putty knife or scraping tool to remove cooked on debris from the bottom of the lid.
-
Using degreaser or hot soapy water scrub the bottom of the lid clean.
-
Ensure the gasket channel is free of cooked on oil and/or debris.
-
Use a clean dry towel to dry the bottom of the lid and gasket channel.
-
Clean the rim (top) of the vat where the lid gasket contacts and seals.
Install the Gasket
Replace the gasket by doing the following:
-
Starting at one corner begin pushing the gasket into the lid gasket channel.
-
Continue by pushing all four sides in to the lid gasket channel a few inches at a time along the length of the gasket until completely seated.
-
Close the lid and engage the lid handle.
-
Ensure the gasket is not pinched or the lid hindered.