|
|
|
Clean Out Mode

|
Burn Risk Do not close lid with water and/or cleaner in vat. Water under pressure becomes superheated. When lid is opened, escaping water and steam can result in severe burns. |

|
To avoid personal injury, always wear PPE when cleaning vat and follow instructions on the cleaning solution. |
Always wear chemical splash goggles or face shield and protective rubber gloves when cleaning the vat as the cleaning solution is high in alkaline. Avoid splashing or other contact of the solution with your eyes or skin. If solution comes in contact with your eyes rinse thoroughly with cool water and see a physician immediately.
|
NOTICE - |
To avoid equipment damage, do not clean stainless steel with abrasive tools, abrasive cleaners or corrosive chemicals. |
|
NOTICE - |
To avoid equipment damage and ensure lid seal, do not strike tools on vat band or vat rim. |
|
NOTICE - |
To avoid damaging elements, do not scrape or scrub with abrasive tools or pads. Scratches on the elements may cause breading to stick to them and burn. |
Clean Out mode, sometimes referred to as boil-out or deep clean, is a thorough cleaning of the vat. This is performed after the initial installation of the fryer and during every oil change. It is important to monitor the oil as it may need to be replaced sooner than scheduled. The Clean Out mode should be done when the oil color is too dark, product tastes burnt, oil smells burnt, or oil is smoking.
The Clean Out mode should be substituted for end-of-day cleaning. Prior to performing this procedure:
-
Do not refill oil reservoir as oil in the reservoir must be discarded as part of the clean out procedure.
-
Perform a Quick Filter.
-
Clean Filter Pan Assembly.
Clean Out Mode Menu Overview
Below are the menu options used in this procedure. Select the 1. FILTER menu, and then press the P (Program) button twice to select 8. CLEAN-OUT and perform clean out tasks.
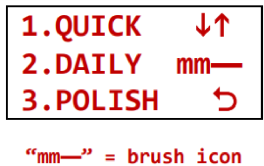
Menu (screen) 1
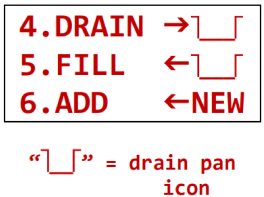
Menu (screen) 2

Menu (screen) 3
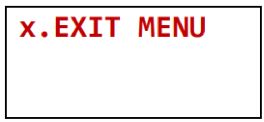
Menu (screen) 4
Access Clean Out Mode

Use the following steps to access the Clean Out menu. An indicator light displays next to active options during procedure.
-
If necessary, drain and dispose of the old unusable oil.
-
Press and hold the P (Program) button.
-
Press the 1. FILTER button.
-
Press the P (Program) button twice. The 8. CLEAN-OUT menu displays.
-
Press the 8. CLEAN-OUT button. =CLEAN OUT= HAS OIL BEEN REMOVED? YES NO displays.
-
Press YES. IS VAT FILLED WITH WATER & CLEANER? displays.
-
Proceed to Perform the Clean-Out Preparation.
Perform Clean Out Preparation
-
Remove bottom drain pan and place a large, empty pan under drain valve.
-
Remove the
-
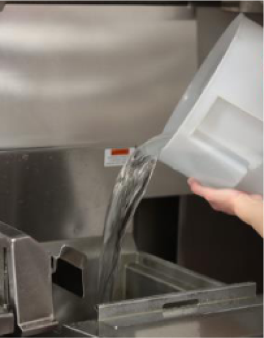
Add 20 ounces (.59 L) of degreaser concentrate into vat.
-
Fill the vat with hot water to top fill line. This can be done with a 6 inch full-size pan.
-
Continue to Heated Clean-Out.
Perform Heated Clean Out
This procedure requires immediate cleaning without soaking overnight.
-
If necessary, press the ON button to power on the unit. =CLEAN OUT= HEATING 78F x! displays.
-
WAIT. The temperature rises to 205° F (96.1° C), and then a 15:00 minute timer starts with an alert sounding. =CLEAN OUT= cleaning displays.
-
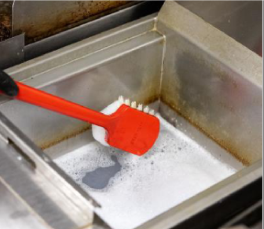
Use a scrub brush on the vat walls to loosen any crumbs or debris.
-
Place fryer baskets and presses in cleaning solution and scrub with brush.
-
Clean basket support by dipping half of it in solution and scrubbing it with brush over the vat. Repeat with the other half of the basket support.
-
Take baskets, presses, and basket support to sink to be washed, rinsed, sanitized, and air-dried.
-
Press the power off button. =DRAIN= DRAIN (hold) and next► displays.
-
Clean the oil reservoir by discarding remaining oil, washing, rinsing, sanitizing and air drying.
-
Proceed to Drain Cleaning Solution.
It is not necessary for cleaning solution to boil to clean vat.
If the solution foams up or boils too aggressively, press and hold the "+ -" button at lower left and adjust the temperature setting lower.
Allow fryer baskets to dry completely and then return to fryer.
When the timer runs out and sounds the alert, the =CLEAN OUT= *DONE*, TURN FRYER OFF message displays.
Drain Cleaning Solution
When the Clean-Out mode is complete, the cleaning solution needs to be drained from the vat.
-
Remove filter pan.
-
Place a large, empty pan under the drain valve.
-
Press NEXT on menu.
-
Press YES when prompted.
-
Push and hold DRAIN button to drain cleaning solution into large pan.
Do not drain all cleaning solution at one time as weight of pan will be heavy and can cause injury.
-
When the pan is partially full, release the button and the water stops draining.
-
Remove the bucket/tub/pan from under the fryer and dispose.
-
Repeat steps 5, 6, and 7 in this section until the vat is completely drained.
-
Press the NEXT button. IS POT EMPTY? displays.
-
Confirm all the water is drained from the vat, and then press YES.
-
Proceed to Rinse the Vat with Clean Water.
Rinse Vat with Clean Water

|
To avoid personal injury, keep floor surrounding equipment clean and dry. |
During this procedure when the drain is open, all the water, cooking debris, and cleaner exits the bottom of the unit. The control board does not regulate, warn or display the amount of flow through the unit in to the bucket/tub/pan, this must be done manually. Do not overflow the bucket/tub/pan.
NOTE: Some fryer cleaning solutions require a vinegar rinse. Please check product instructions.
-
Ensure the bucket/tub/pan is under the drain.
-
Press OPEN DRAIN button when RINSE displays.
-
Use clean water to rinse the side walls and bottom of the vat.
-
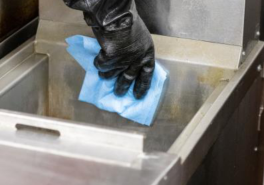
Use a towel sprayed with sanitizer to scrub the vat.
-
Stop when the bucket/tub/pan is full or the unit is rinsed clean.
-
Remove the bucket/tub/pan from under the fryer and dispose.
-
Repeat steps 2 through 6 until the vat is rinsed clean of cooking debris, cleaner and dirty water. It is recommended to perform a final rinse, ensuring sanitizer reside is rinsed from the vat.
-
Proceed to Purge the Oil Lines.
Purge Oil Lines
Clear dirty, unusable oil, water and debris from the oil lines by doing the following:
-
Confirm the fresh oil tank has new oil in it.
-
Press and hold the PUMP button until clean, fresh oil comes through the jets in the bottom of the vat.
-
Once the lines are purged, press the NEXT button. ==WIPE== OPEN DRAIN display.
-
Proceed to Wipe the Vat.
Wipe Vat
-
Place a bucket/tub/pan under the fryer.
-
Press the OPEN DRAIN button.
-
Use a clean towel to wipe the sides and bottom of the vat. Guide all the remaining water and debris down the drain.
-
Remove the bucket/tub/pan from under the fryer and dispose.
-
Press the NEXT button to close drain. EXIT CLEAN-OUT? displays.
-
Proceed to Exit Confirmation.
Exit Confirmation
-
If the clean-out process is completed, press the YES button. If the drain is open, the control board automatically closes the drain. KEEP OFF UNTIL FILLED displays.
-
If the power switch is in the ON position, move it to the OFF position to power off the unit.
-
Fill the vat with fresh oil to the lower oil indicator line on the side of the vat.
-
Once the vat is filled with fresh oil, the fryer is ready for normal operations.