|
|
|
Discarding the Oil
Discard Using Bulk Oil Dispose System

NOTE: “BULK OIL DISPOSE?” in the Special Program Mode or Setup Mode, must to set to “YES” for the Bulk Oil Dispose System to operate. Also, a password code step (1, 2, 3) can be added in Special Programming, SP-27.
-
Connect female quick disconnect attached to the hose at the rear of fryer, to the correct male quick disconnect at the wall. Once attached, the hose can remain connected unless the fryer is moved.
-
Press and hold either filter button until “*FILTER MENU*”, and “1.EXPRESS FILTER?” displays.
-
Press and release the right arrow button twice until “3.DISPOSE” displays. Press “✓” button and “DISPOSE?” “YES NO” displays, or enter code 1, 2, 3, if SP-27 is set to “YES”.
-
Press “✓” button; “DRAIN VAT?” “YES NO” displays. Press “X” button if filter pan has oil in it, Skip to step 9.
-
Press “✓” button and “OPEN DRAIN” displays. Pull out on drain knob to open drain and “DRAINING” displays. Oil drains from vat into filter pan.
-
Display shows “VAT EMTY” “YES NO”. Verify that vat is empty, and press “✓” button.
-
Display shows “CLEAR OLD OIL FROM OIL LINES” “✓=PUMP” “X=DONE”. Press and hold “✓” button for a few seconds to clear old oil from lines. Once cleared, press “X” button.
-
Display shows “CLN VAT COMPLETE” “YES NO”. Once vat is clean, press “✓” button.
-
Display shows “DISPOSE” and then “✓=PUMP” “X=DONE. Press “✓” button.
-
Display shows “DISPOSING...” “X=STOP” and oil is pumped from filter pan to bulk oil container. When all oil is pumped from pan, press “X” button.
-
Display shows “DISPOSE” and then “✓=PUMP” “X=DONE. Press “X” button; “CLOSE DRAIN” displays. Close drain.
-
Display shows “MANUAL FILL VAT” (or “FILL VAT FROM BULK” if equipped), followed by “IS POT FILLED?”, along with “YES NO”. Fill the vat to the lower indicator line on the rear of the vat.
-
Press “✓” button and fryer returns to normal operation.
Discard Oil Using Optional Oil Discard Shuttle ODS 400

|
With prolonged use, the flashpoint of oil is reduced. To avoid personal injury or property damage, do not use oil that is foaming or shows signs of excessive smoking. If the oil temperature exceeds 420°F (216°C), immediately shut off the power at the main circuit breaker and have the fryer repaired. If oil temperature exceeds its flash-point, fire will occurs, resulting in severe burns and/or property damage. |
|
|
To avoid severe burns and equipment damage:
|
|
|
To avoid personal injury:
|
The shuttle holds 1 full vat, or 2 split vats of oil.
|
|
|
-
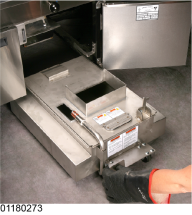
Open the door, lift up on the filter pan stop and pull out the filter pan assembly using the handle on the filter pan.

-
Release cover latch, and hinge back cover on oil disposal shuttle. Ensure crumb catcher is in place.

-
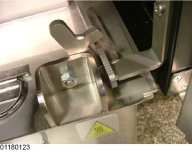
Roll oil disposal shuttle under fryer until it stops. Ensure drain aligns with opening in shuttle.
-
Press and hold either filter button until “*FILTER MENU*”, along with “1.EXPRESS FILTER?” display.
-
Press and release the right arrow twice until “3.DISPOSE” displays. Press “✓” button and “DISPOSE?” “YES NO” displays(If control suspects oil in filter pan “CAUTION IS THERE OIL IN PAN? YES NO” may display. Ensure filter pan is empty before proceeding).
-
Press “✓” button and “IS DISPOSAL UNIT IN PLACE?” “YES NO” displays.
-
With discard shuttle rolled into place, press “✓” button and “OPEN DRAIN” displays. Pull out on drain knob to open drain and “DRAINING” displays. Oil now drains from the vat into the shuttle.
-
“VAT EMTY” “YES NO” displays. Verify that vat is empty, and press “✓” button.
-
“CLEAR OLD OIL FROM OIL LINES” “✓=PUMP” “X= DONE” displays. Press and hold “✓” button for a few seconds to clear old oil from lines. Once cleared, press X.
-
“CLN VAT COMPLETE” “YES NO” displays. Once vat is clean, press “✓” button and “CLOSE DRAIN” displays. Push in on the drain knob.
-
“MANUAL FILL POT”, followed by “IS POT FILLED?” “YES NO” displays. Fill the vat to the lower indicator line on the rear of the vat and then press “✓” button.
-
Remove the oil disposal shuttle from under fryer and replace with the filter pan assembly.
-
Close and latch the cover and roll oil disposal shuttle to disposal container.
-
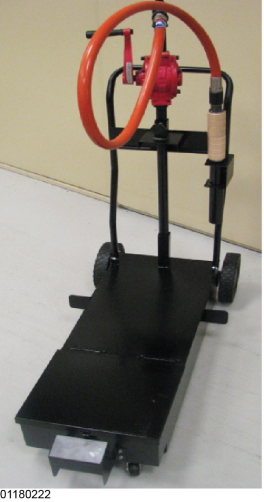
Grasp the wooden handle and remove the hose assembly from the holder.

-
Ensure the hose nozzle is pointed into the disposal container and turn pump handle rapidly (fast) in order to prime the pump and to get oil to flow through pump.
-
Once shuttle is empty, return the hose assembly to the holder.
Discard Oil Using Optional Oil Discard Shuttle ODS 450
|
|
With prolonged use, the flashpoint of oil is reduced. To avoid personal injury or property damage, do not use oil that is foaming or shows signs of excessive smoking. If the oil temperature exceeds 420°F (216°C), immediately shut off the power at the main circuit breaker and have the fryer repaired. If oil temperature exceeds its flash-point, fire will occurs, resulting in severe burns and/or property damage. |
|
|
To avoid severe burns and equipment damage:
|
|
|
To avoid personal injury:
|
The shuttle holds 1 full vat, or 2 split vats of oil.
|
|
|
-
Open the door, lift up on the filter pan stop and pull out the filter pan assembly using the handle on the filter pan.
-
Release cover latch, and hinge back cover on oil disposal shuttle. Ensure crumb catcher is in place.
-
Roll oil disposal shuttle under fryer until it stops. Ensure drain aligns with opening in shuttle.
-
Press and hold either filter button until “*FILTER MENU*”, along with “1.EXPRESS FILTER?” display.
-
Press and release the right arrow twice until “3.DISPOSE” displays. Press “✓” button and “DISPOSE?” “YES NO” displays(If control suspects oil in filter pan “CAUTION IS THERE OIL IN PAN? YES NO” may display. Ensure filter pan is empty before proceeding).
-
Press “✓” button and “IS DISPOSAL UNIT IN PLACE?” “YES NO” displays.
-
With discard shuttle rolled into place, press “✓” button and “OPEN DRAIN” displays. Pull out on drain knob to open drain and “DRAINING” displays. Oil now drains from the vat into the shuttle.
-
“VAT EMTY” “YES NO” displays. Verify that vat is empty, and press “✓” button.
-
“CLEAR OLD OIL FROM OIL LINES” “✓=PUMP” “X= DONE” displays. Press and hold “✓” button for a few seconds to clear old oil from lines. Once cleared, press X.
-
“CLN VAT COMPLETE” “YES NO” displays. Once vat is clean, press “✓” button and “CLOSE DRAIN” displays. Push in on the drain knob.
-
“MANUAL FILL POT”, followed by “IS POT FILLED?” “YES NO” displays. Fill the vat to the lower indicator line on the rear of the vat and then press “✓” button.
-
Remove the oil disposal shuttle from under fryer and replace with the filter pan assembly.
-
Close and latch the cover and roll oil disposal shuttle to disposal container.
-
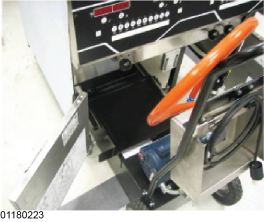
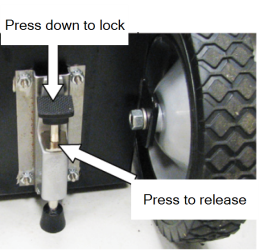
Press down on top of brake to secure unit in place.
-
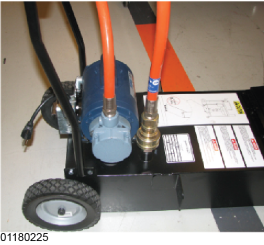
Disconnect fitting from top of ODS and connect to disposal container.
-
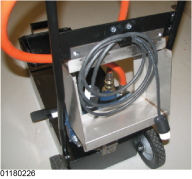
Using the power cord on the back of the shuttle handle, plug it into the short cord from the junction box.
-
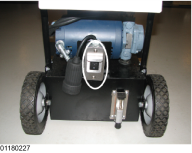
Turn power switch to the on position.

-
Plug the shuttle electrical cord into the receptacle under the disposal container control, and then press and hold switch on container controls to pump oil from shuttle to the container.

-
Using gloves or protective cloth, disconnect the fitting from the disposal container and connect it back onto the shuttle.
|
|
Burn Risk To avoid burns, use PPE when connecting to or disconnecting from oil disposal unit. |