|
|
|
Discarding the Oil

|
With prolonged use, the flashpoint of oil is reduced. To avoid personal injury or property damage, do not use oil that is foaming or shows signs of excessive smoking. If the oil temperature exceeds 420°F (216°C), immediately shut off the power at the main circuit breaker and have the fryer repaired. If oil temperature exceeds its flash-point, fire will occurs, resulting in severe burns and/or property damage. |
|
NOTICE - |
To avoid damage to the unit, pressure during oil disposal should not exceed 40 psi. If pressure exceeds 40 psi, contact a service technician. |
Discarding Oil Using the RTI System
-
Ensure dispose is set to RTI.
-
Press and hold the Filter button (on either side) until “*FILTER MENU*”, along with “1.AUTO FILTER?” displays.
-
Press and release the down arrow twice until 3.DISPOSE displays.
-
Press the Confirm button and DISPOSE? “YES NO” displays.
-
Press the Confirm button and DRAINING” displays and oil drains into the filter pan. (If control suspects oil in filter pan “CAUTION IS THERE OIL IN PAN? YES NO” may display. Ensure filter pan is empty before proceeding.)
-
“VAT EMTY” “YES NO” displays. Press the Confirm button and “CLEAR OLD OIL FROM OIL LINES” “✓=PUMP” “X =DONE” displays.
-
To ensure no old oil remains in the oil lines, press and hold the Confirm button for a few seconds. Once lines are clear, press the Cancel button and “CLN VAT COMPLETE” “YES NO” displays.
-
Clean the vat and then press the Confirm button.
Refer to Using Deep Clean Mode.
-
The drain closes and “FILL POT FROM BULK” “YES NO” displays. Open the door with the RTI switch and press and hold the “DISPOSE” button on the RTI switch until the filter pan is empty.
-
To refill the vat, press and hold the Confirm button until cold oil is up to the lower oil indicator in vat.
Refer to Filling or Adding Oil.
-
Press the Cancel button and “IS POT FILLED” “YES NO” displays. If vat is full, press the Confirm button and controls return to normal operation.
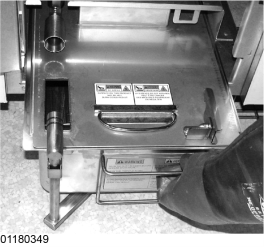
Discarding Oil Using the Oil Discard Shuttle
|

|
-
Ensure dispose is set to NO or VAC.
-
Open center door and pull the filter pan assembly from under fryer and replace with oil discard shuttle.
-
Press and hold the Filter button (on either side) until “*FILTER MENU*”, along with “1.AUTO FILTER?” display.
-
Press and release the down arrow button twice until “3.DISPOSE” displays. Press the Confirm button and “DISPOSE?” “YES NO” displays. (If control suspects oil in filter pan “CAUTION IS THERE OIL IN PAN? YES NO” may display. Make sure filter pan is empty before proceeding )
-
Press the Confirm button and “IS DISPOSAL UNIT IN PLACE? “YES NO” displays.
-
With discard shuttle rolled into place, press the Confirm button and “DRAINING” displays. Oil now drains from the vat into the shuttle.
-
“VAT EMTY “YES NO” displays. Verify that vat is empty, and press the Confirm button.
-
“CLEAR OLD OIL FROM OIL LINES” “✓=PUMP” “X =DONE” displays. To ensure no old oil remains in the oil lines, press and hold the Confirm button for a few seconds.
-
Once lines are clear, press X button. “CLN VAT COMPLETE” “YES NO” displays.
-
Clean the vat and then press the Confirm button.
Refer to Using Deep Clean Mode.
-
“MANUAL FILL POT”, followed by “IS POT FILLED” “YES NO” display. Fill the vat to the lower indicator line on the rear of the vat and then press the Confirm button.
See Filling or Adding Oil (locations without RTI). Controls return to normal operation.
-
Remove the discard shuttle from under fryer and replace with the filter pan assembly.
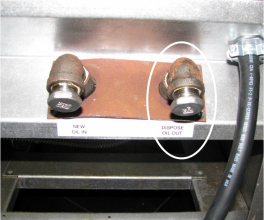
Discarding Oil Using Non-RTI (Rear) Systems
-
Ensure dispose is set to rear.
-
Remove pipe plug from the DISPOSE OIL OUT elbow in the rear of the fryer, and attached dispose plumbing to the elbow; 1/2 inch diameter, standard NPT threads.
-
Ensure the BULK OIL DISPOSE is set to REAR in the SETUP Mode.
See Setup Mode.
-
Press and hold the Filter button (on either side) until “*FILTER MENU*” displays, along with “1.AUTO FILTER?”.
-
Press and release the down arrow button twice until 3.DISPOSE displays.
-
Press the Confirm button and “DRAIN VAT” “YES NO” displays .
-
Press the Confirm button and “DRAINING” displays and oil drains into the filter pan. (If control suspects oil in filter pan “CAUTION IS THERE OIL IN PAN? YES NO” may display. Ensure filter pan is empty before proceeding.)
-
“VAT EMTY” “YES NO” displays. Press the Confirm button and “CLEAR OLD OIL FROM OIL LINES” “✓=PUMP” “X =DONE” displays.
-
To ensure no old oil remains in the oil lines, press and hold the Confirm button for a few seconds. Once lines are clear, press the Cancel button and “CLN VAT COMPLETE” “YES NO” displays.
-
Clean the vat and then press the Confirm button.
Refer to Using Deep Clean Mode.
-
Press the Confirm button. “DISPOSING...” “X=STOP displays.
-
When all oil is pumped from pan, press the Cancel button (STOP).
-
Press the Cancel button and “MANUAL FILL VAT”, followed by “IS POT FILLED?”, along with “YES NO” display. Fill the vat to the lower indicator line on the rear of the vat.